
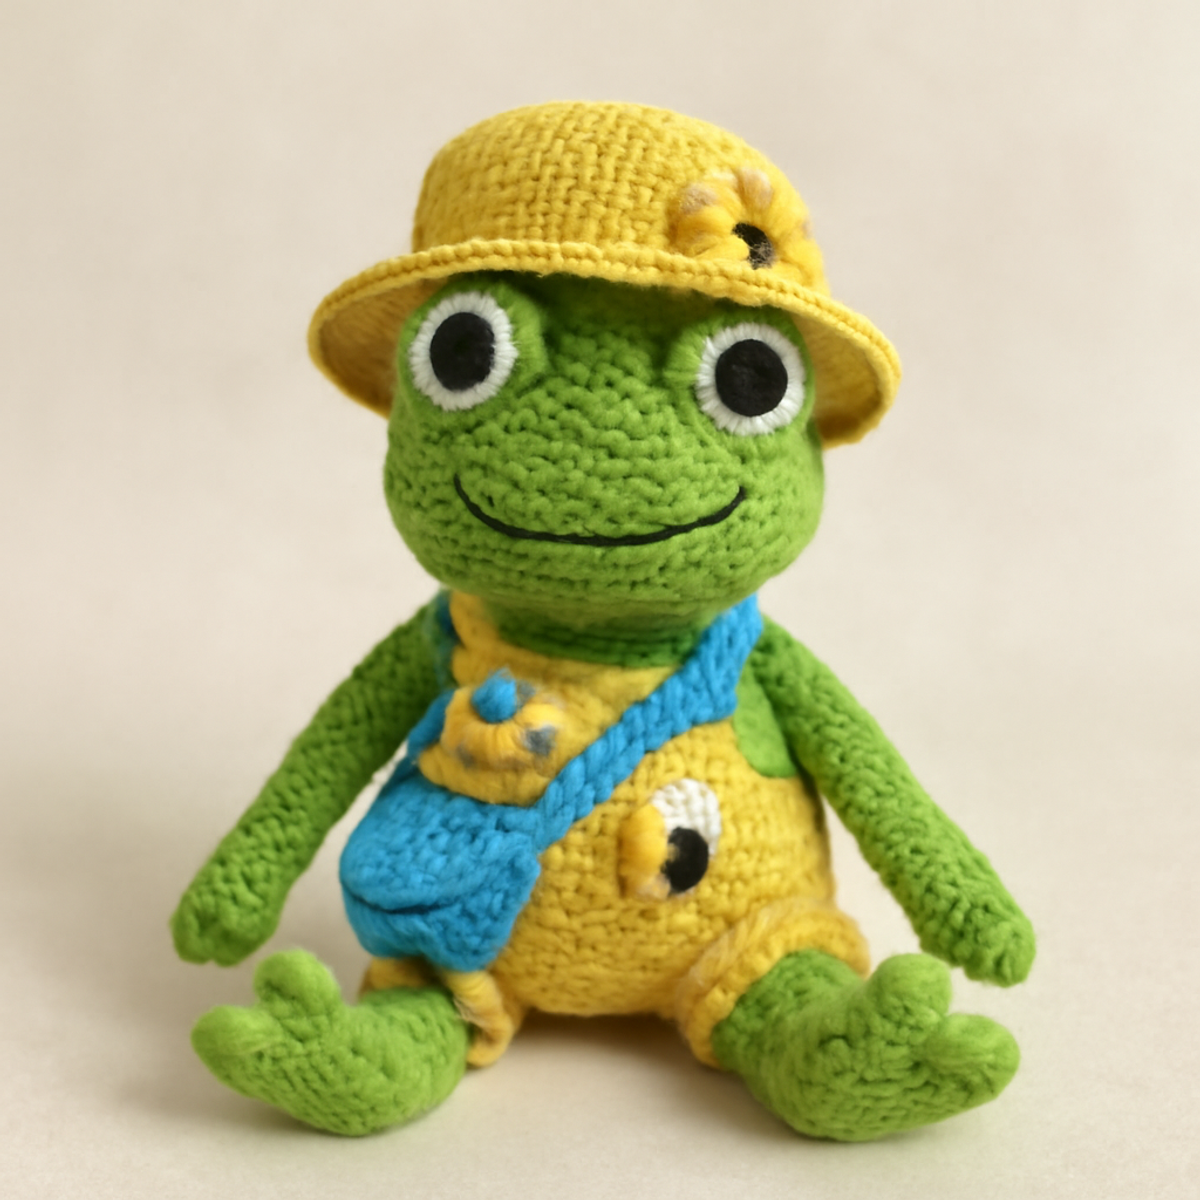
As I settled into my cozy nook with a ball of vibrant green yarn, I couldn’t help but feel the spark of creativity start to flow. The Whimsical Frog Amigurumi crochet frog pattern is here to brighten your day, bringing joy and cheer to every stitch and moment. With its playful design and delightful accessories, this project isn’t just about crafting—it’s an opportunity to explore your imagination and enhance your amigurumi skills. Plus, the bright colors and charming character make it a standout piece, perfect for whimsical home decor or thoughtful gifts for little ones. Dive in, and let the creativity leap as you create this enchanting frog that’s sure to bring smiles all around!
Whimsical Frog Amigurumi Materials & Tools
Yarn
- Medium Weight Yarn – Approximately 200-250 yards in green (for the frog), yellow (for the overalls and hat), and white (for the eyes) will bring your crochet frog pattern to life.
- Acrylic or Cotton Fibers – Choose for their durability and vibrant colors, perfect for amigurumi.
Tools & Notions
- 4.0mm (G/6) Hook – This size ensures tight stitches, essential for shaping your whimsical frog.
- Safety Eyes – Use white for the eyeballs and blue for the irises to give your frog character and charm.
- Sewing Needle – Necessary for assembling the pieces and securing details beautifully.
- Stitch Markers – Helpful for tracking round changes and maintaining consistent tension throughout the project.
Feel ready to make your own adorable friend with this charming crochet frog pattern! Happy crafting!
Why Choose This Crochet Frog Pattern?
Vibrant Design: The lively colors and charming accessories make this crochet frog pattern an eye-catching project that brings joy to every room.
Skill Enhancement: Perfect for intermediate crafters, it’s an excellent way to hone your amigurumi skills while having fun.
Whimsical Touch: Infuse your decor or gifts with a playful spirit that captures the hearts of both children and adults alike.
Enticing Accessories: The delightful addition of a hat and bumblebee motifs lets you express your creativity and add personal flair to the finished piece.
Engaging Crafting Experience: Enjoy a satisfying crochet journey filled with smiles and inspiration as you create this adorable froggy friend!
Gauge & Sizing Notes
Don't skip the gauge swatch! For the Whimsical Frog Amigurumi, checking your tension is essential to ensure this cheerful character stands out beautifully and has the correct proportions. A general guideline for your crochet gauge is approximately 4×4 inches (10×10 cm) to achieve a tight stitch count suitable for amigurumi. If your tension is tighter or looser than desired, don’t fret! To make the frog's body larger, adjust your starting chain in multiples of 6 + 2, and if your gauge doesn’t match, simply try going up a hook size. Making these adjustments will help you craft a delightful frog that fits perfectly into your home decor or as a playful gift!
Step-by-Step Pattern for Whimsical Frog Amigurumi
Row 1: Start the Head
Begin with a magic ring, chaining 1 and placing 6 single crochet (sc) into the ring. Pull tightly to close the ring, ensuring the stitches are snug. This initial round will create the base for your frog's head, and your work should form a small round shape at this point. (6 sts)
Row 2: Increase the Head
For the next round, work 2 sc in each stitch around to increase the size of the head. This will give your frog a rounded shape that will soon become more defined. Remember to use a stitch marker to track your rounds; your work should look fuller and rounder after this step. (12 sts)
Row 3: Continue Increasing
In this row, perform 1 sc in the first stitch, then 2 sc in the next stitch, repeating this pattern around. This method gradually enlarges your frog's head while maintaining a smooth shape. By the end, you should see a significant increase in size. Your work should feel plush and round. (18 sts)
Row 4: More Shaping
Next, work 1 sc in the first two stitches, then 2 sc in the next stitch throughout the round. This row will add more volume to your frog's head, ensuring it takes on a cute and bulging character. Your work should continue to rise and fill out beautifully. (24 sts)
Row 5: Form the Muzzle
To define the frog’s face, work 1 sc in the first three stitches, then 2 sc in the next stitch. Make sure to pull your stitches tight to maintain a round shape. At this point, the characteristic froggy look will start emerging and your work should present a noticeable bulge at the front. (30 sts)
Row 6: Complete the Head
Continue with 1 sc in the first four stitches, then 2 sc in the next stitch. This allows the head to form a wide top, creating the perfect space for the safety eyes. By now, your work should feel full and round, picturing a friendly frog face. (36 sts)
Row 7: Insert the Eyes
Place your safety eyes between rows 4 and 5, ensuring they are spaced evenly. After securing them, continue working 1 sc in each stitch for the next two rounds. This establishes a stable base for the frog’s features. Your work should feel dense, and the eyes should sit snugly within the head. (36 sts)
Step 1: Create the Body
Switch to green yarn and chain 1. Begin the body by sc in the same stitch as your previous round. Continue with 1 sc in each of the next 5 stitches, inc in the next stitch, repeating until you reach the end. This section should start extending down, transitioning smoothly from the head. (42 sts)
Step 2: Define the Torso
For the next row, work 1 sc in each of the first 6 stitches, then inc in the next stitch. This will help create a rounded torso for the frog. Your work should feel substantial and start resembling the frog's body. Keep an eye on your stitch count! (48 sts)
Step 3: Shape the Legs
Next, crochet the legs. To do this, chain 1, sc into the next 12 stitches to create the first leg. Then, leave the next 6 stitches unworked, which will give the impression of a gap for the frog's belly. Create the second leg by repeating the sc in the next 12 stitches. Your work should now display a clear separation between the body and legs. (48 sts)
Step 4: Finish the Body
Continue down the body by adding rows of 1 sc until you've reached the desired torso height. This forms the full body of your whimsical frog. Once completed, your work should appear well-defined, smoothly transitioning from head to feet. The frog's playful character will start to show!
Step 5: Crochet the Overalls
Switching to yellow yarn, chain 1 and work 1 sc in each stitch around the torso. This will form the base for your frog's overalls. Continue to increase by creating a pattern like 1 sc in the first stitch, 2 sc in the next stitch, maintaining the whimsical charm. Your work should start resembling fun overalls. (50 sts)
Step 6: Create the Limbs
To create the limbs, begin with a magic ring and chain 1. Work 6 sc in the ring, increasing as needed to form the legs with 1 sc in the first stitch, inc in the second. Complete 2 limbs for the front and back of your frog, adjusting size to your preference. Your limbs should feel sturdy and balanced. (6-18 sts per limb)
Step 7: Assemble the Frog
Align all pieces—head, legs, and body—carefully, using your sewing needle to secure them together. Ensure that they provide a secure hold and balanced look. As you attach the arms and legs, your whimsical frog amigurumi should start taking its cheerful, playful shape entirely!
Step 8: Add Accessories
Don’t forget to create the cute yellow hat and bumblebee motifs using your yellow yarn. Assemble these tiny accessories using slip stitches, sc, and simple chains. Attaching these personal touches will complete the playful aesthetic of your crochet frog pattern!
Step 9: Final Touches
Weave in any loose yarn ends and lightly block the completed pieces to maintain their shapes. Your whimsical frog amigurumi will now stand proudly, perfect for gifting or showcasing in your decor!
Crochet Frog Pattern Variations
Embrace your creativity with these delightful variations to customize your whimsical frog amigurumi!
-
Yarn Weight Swaps: Experiment with bulky yarn for a cuddly, larger frog, or use sport weight for a dainty version.
-
Fiber Alternatives: Try soft wool for warmth or organic cotton for a natural look—each option offers a unique texture and drape.
-
Color-Blocking Ideas: Add a pop of personality by incorporating pastel shades for the frog or colorful stripes in the overalls, creating a whimsical rainbow effect.
-
Sizing Adjustments: Change your crochet hook size to alter the dimensions of your frog, adjusting the height to fit perfectly in your decor. Smaller hooks can yield a tiny pocket-sized friend!
-
Texture Modifications: Consider adding a fluffy pom-pom on the hat or fun fringe along the overalls for extra flair, enhancing your project's visual appeal.
-
Eye Customizations: Use safety eyes in various colors or even sew on felt shapes for a playful twist—each choice adds a unique charm to your amigurumi.
-
Accessory Enhancements: Create seasonal themed accessories like a holiday hat or flower crown that can be swapped out, making this frog a versatile decorative piece.
-
Face Expressions: Adjust the placement or type of safety eyes, or add embroidered smiles or frowns to give your frog a personality that speaks volumes!
With these variations, your amigurumi frog will not only stand out but also become a cherished reflection of your creativity! Happy crafting!
How to Wash and Care for Your Whimsical Frog Amigurumi
Machine Washing: Use a gentle cycle with cold water to clean your crochet frog pattern. Placing it in a mesh laundry bag can offer extra protection during the wash.
Hand Washing: For delicate care, hand wash using a mild soap in cold water. Gently swish the amigurumi around, ensuring not to agitate too much to prevent any pilling.
Drying/Blocking: After washing, lay your frog flat on a clean towel to dry. Avoid hanging, as it can distort the shape. Lightly block if needed to maintain its adorable form.
Storage: Keep your whimsical amigurumi in a cool, dry place away from direct sunlight. This will prevent fading and help maintain its vibrant colors for years to come!
Expert Tips for Crochet Frog Pattern
-
Consistent Tension: Keep your tension even throughout the project to ensure uniformity in shape and size, particularly in the limbs and head.
-
Use Stitch Markers: Track your rounds accurately with stitch markers to prevent losing count and ensure seamless transitions in your crochet frog pattern.
-
Count Stitches Frequently: Avoid common mistakes like increasing or decreasing unintentionally by double-checking your stitch count every few rounds for a polished finish.
-
Block Pieces: Lightly block your completed parts to maintain their shape, giving your whimsical frog an adorable and well-defined look.
-
Secure Loose Ends: Weave in all ends neatly for a clean finish, ensuring that your project is both durable and aesthetically pleasing.
What to Pair with Whimsical Frog Amigurumi
Create a delightful collection of whimsical accessories that match your enchanting frog's vibe, and let your creativity blossom!
- Crochet Bumblebee: Add a cheerful companion with bright stripes, echoing your frog's accessories while bringing even more whimsy to your decor.
- Sunflower Garland: Craft a playful garland featuring vibrant sunflowers that resonates with your project's colors and enhances its cheerful spirit.
- Matching Frog Pouch: Make a small pouch resembling your frog, perfect for storing crafting essentials or as a cute gift bag that ties everything together.
- Tentacle Friend Toy: Create an adorable tentacle companion that adds fun texture and randomness, providing a playful friend to your crochet frog.
- Frog-Themed Keychain: A mini version of your frog makes for a charming keychain, letting your creative spirit bloom wherever you go.
Dive into these playful pairings, and let your crochet frog pattern inspire even more magical creations!
Whimsical Frog Amigurumi FAQs
Can I substitute the yarn for my crochet frog pattern?
Absolutely! While the original design calls for medium weight yarn, you can swap acrylic for cotton or even use a different weight. Just be aware that changing yarn types can alter the final appearance and texture, so keep your gauge in mind!
How do I make the amigurumi bigger or smaller?
If you want to adjust the size of your whimsical frog, you can either use a larger crochet hook or double up on the yarn to create thicker stitches. Alternatively, using a lighter weight yarn with the same hook will give you a smaller version. Just remember to adjust the stitch count accordingly for the desired proportions!
Why is my work curling at the edges?
Don't panic! Curling is often caused by too tight of a tension or not using enough increases. I recommend checking your tension when you first start and making sure you're following the increase instructions closely to help shape your frog properly.
Help! I dropped a stitch while crocheting the limbs! What should I do?
It happens to all of us! Just use a crochet hook to pick up the dropped stitch and pull it back through the surrounding loops. If you’re worried about it, you can use a yarn needle to weave in the loose end afterward for extra security.
What size hook should I use for this pattern?
For the whimsical frog amigurumi, a 4.0mm (G/6) crochet hook is recommended. This size creates tight stitches, which are important for holding the shape of your finished piece and preventing stuffing from showing through.
Can I customize the eyes for my amigurumi frog?
Of course! Feel free to play around with different colors or sizes for the eyes. Using safety eyes in various shades can add unique personality to your crochet frog pattern, making it even more delightful. If you're feeling adventurous, you can even create embroidered or felted eyes for a one-of-a-kind look!
Leave a Reply