
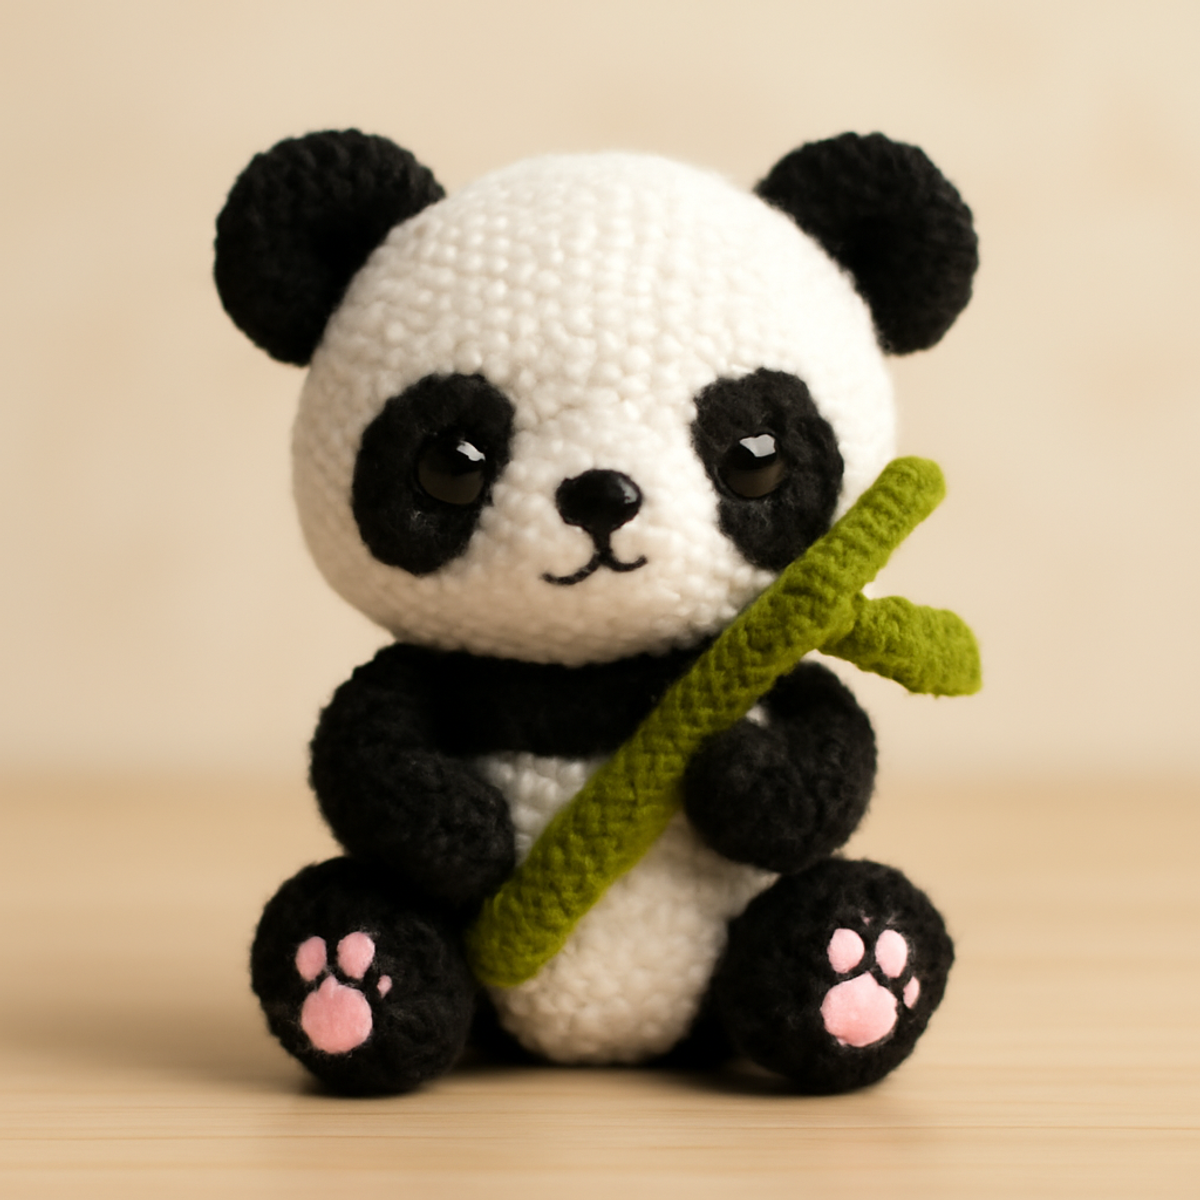
As I settled into my favorite chair, the warmth of a soft yarn in my hands offered the perfect escape from a hectic day. This Cute Panda Crochet Toy is a delightful project that invites you to unleash your creativity while honing your crocheting skills. With its playful charm and plush texture, this panda crochet pattern not only makes for a comforting companion for little ones but also a whimsical decor piece that brightens any space. You’ll love how quickly it comes together, making it an irresistible choice for crafters of all levels. So let’s grab that hook and yarn—your new cuddly friend is just a few stitches away!
Cute Panda Crochet Materials & Tools
-
Yarn
- Medium-Weight Acrylic Yarn – Approximately 100-150 yards in white, black, and green will bring your panda to life.
-
Tools & Notions
- 2.5 mm (US C-2) Crochet Hook – A perfect size to achieve a neat tension for your panda crochet project.
- Safety Eyes – These give your panda its adorable expression; choose a size that fits well for a secure look.
- Fiberfill Stuffing – For a plushy feel, you’ll need enough to fully stuff the arms, body, and head.
- Yarn Needle – Essential for sewing the pieces together securely and weaving in your ends.
- Scissors – Handy for snipping yarn ends as you progress.
- Stitch Marker (Optional) – This can help you keep track of your rounds as you crochet.
Why Is This Panda Crochet Special?
Adorable Design: The cute panda shape is perfect for lovers of soft toys, adding a whimsical charm to any space.
Beginner-Friendly: The straightforward stitches make it accessible for novice crocheters, while still offering a fun challenge for intermediates.
Plush Texture: Using medium-weight yarn, this project results in a delightful, cuddly finish that invites hugs!
Quick & Rewarding: This project comes together swiftly, so you'll enjoy your cozy creation in no time, making it perfect for gifts or personal keepsakes.
Customizable Options: Feel free to play with colors and add fun accessories like scarves or hats to personalize your panda!
Gauge & Sizing Notes
Don't skip the gauge swatch! By checking your tension before diving into your panda crochet project, you ensure that your adorable creation turns out just right. A general guideline for tension in amigurumi is to aim for a 4×4 inch (10×10 cm) square measuring approximately 14 double crochets by 8 rows. If you find your swatch is off, this is an easy fix: to make your panda toy larger, consider using a larger hook size or adjust your starting chain or rounds in multiples of 6. Conversely, if your stitches are too tight, simply swap to a larger hook to achieve that perfect, plush feel. Happy crocheting!
Step-by-Step Pattern for Cute Panda Crochet
Row 1: Magic Ring Setup
Begin by creating a magic ring. Ch 1, then work 6 sc into the ring. Pull the tail to tighten the ring, ensuring that your stitches remain snug. This initial foundation is crucial for building the body of your panda crochet. Your work should form a circle with 6 stitches (6 sts).
Row 2: Increasing the Body
For this round, start with 2 sc in each stitch around to create a lovely cup shape. You'll go from 6 stitches to 12 stitches in total. Make sure to keep your tension consistent, allowing your work to cup nicely. Your stitch count should now be 12 (12 sts).
Row 3: Continuing to Build the Shape
Next, work 1 sc in the first stitch, then inc in the next stitch; repeat this pattern around. This means you will increase your stitch count while maintaining a balanced shape, resulting in 18 total stitches by the end of the round. Your work should feel fuller (18 sts).
Row 4: Expanding the Body
For this round, crochet 2 sc in the first stitch, then 1 sc in the next 2 stitches; repeat until the end of the round. This will help expand the body of your panda crochet, resulting in a total of 24 stitches. A more rounded shape should become evident (24 sts).
Row 5: Standard Body Round
Now, simply sc in each stitch around without any increases. This round will provide the necessary height for your panda's body. Feel free to check your progress, ensuring your work is shaping up to be cute and cuddly. You should still have 24 stitches (24 sts).
Row 6: Shaping the Body
For this round, work 1 sc in the next 3 stitches, followed by 1 inc in the next stitch; repeat to the end. This process enhances the body shape, allowing for gentle curves that create a soft silhouette. You will have 30 stitches in total (30 sts).
Row 7: Beginning to Decrease
To start forming the top of the panda, work 1 sc in the next 3 stitches, then do 1 dec; repeat this pattern all the way around. This round diminishes the overall size, providing a defined shape to the top of your panda's body. Your stitch count should decrease to 24 (24 sts).
Row 8: Continue Decreasing
Continue shaping by crocheting 1 sc in the next 2 stitches, followed by 1 dec; repeat until the end. This will refine the shape further, making your pandas look even cuter. By the end, you should have 18 stitches remaining (18 sts).
Row 9: Final Round of Reducing
Now, work 1 sc in the next stitch and then do another dec; repeat around. This will continue to help taper the body of your panda crochet, making it ready for stuffing and closing. You should end this round with 12 stitches (12 sts).
Step 10: Stuffing and Closing
At this point, carefully stuff the body with fiberfill, adding just enough to give it a plush feel without overstuffing. Once you’re satisfied with the shape, use a yarn needle to close the top of the body, weaving through your remaining stitches and pulling tight. Your panda will begin to take form!
Step 11: Creating the Head
Next, repeat Rows 1-9 to build the head using the same principles. Remember, the head should look a tad larger than the body, making your panda crochet proportions exactly right. Complete the head with 12 stitches before stuffing and closing (12 sts).
Step 12: Adding Details
To make your panda truly adorable, craft ears by making 2 small circles using sc stitches (around 6-8 sts). Attach these to the top of the head securely. You can also add black accents for the eyes and nose to enhance its cuteness!
Step 13: Assembly Time
Lastly, attach the head to the body, using your yarn needle to stitch securely. Don’t forget to position the safety eyes and any additional features like paws or a bamboo stick if desired. This final assembly step brings your cute panda crochet to life!
How to Wash and Care for Your Panda Crochet
Machine Washing: Use cold water on a gentle cycle to avoid agitation that can lead to felting or pilling, ensuring your panda crochet stays soft and cuddly.
Hand Washing: For best results, hand wash in cold water with mild detergent, gently squeezing without scrubbing to maintain the plush texture of your finished toy.
Drying/Blocking: Lay your panda flat on a towel to dry, reshaping if needed; avoid hanging to prevent stretching, keeping those adorable features intact.
Storage: Store your panda crochet in a cool, dry place away from direct sunlight to preserve its colors and prevent any unwanted pillaging from furry friends!
Expert Tips for Your Panda Crochet
Tension Matters: Keep your tension consistent while crocheting to ensure a uniform fabric, which is vital for a well-structured and adorable toy.
Count Carefully: Pay close attention to your stitch counts in each round, especially when combining increases and standard rounds; this prevents any distortion in your panda's shape.
Final Touches: When assembling, secure all components tightly to maintain the toy’s charm and ensure it stands up to cuddles and playtime!
Gentle Shaping: While blocking isn't typical for amigurumi, do some gentle shaping on parts like the ears to enhance the overall look of your cute panda crochet.
Don’t Rush Stuffing: Add fiberfill stuffing gradually; overstuffing can lead to an imperfect shape, so test the plush feel along the way for the perfect cuddly companion!
What to Make after Adorable Crochet Panda Toy?
Create delightful companions and charm with these perfect pairings for your panda crochet project.
- Charming Panda Scarf: A cozy accessory that adds a touch of whimsy, using the same yarn for a delightful combination.
- Playful Bamboo Blanket: Capture the essence of the panda’s favorite snack, creating a soft and snuggly environment for cozy cuddles.
- Fun Animal Friends: Craft a small collection of amigurumi animals to join your panda, enhancing your toy family with playful diversity.
- Mini Panda Keychain: Utilize leftover yarn to whip up a cute keychain version, ensuring your panda’s spirit travels everywhere you go.
- Whimsical Felt Accessories: Add personality with felt hats or scarves, allowing for seasonal variations to personalize your playful panda.
Panda Crochet Variations & Substitutions
Feel free to explore your creativity by customizing this panda crochet pattern, making it truly your own!
-
Color Variations: Replace black yarn with a deep navy for a unique look that adds a touch of elegance.
-
Yarn Type Swap: Consider using cotton yarn for a crisper finish, offering a different texture and durability. The fresh appearance of cotton can elevate the overall design!
-
Size Customization: Scale the design up or down by adjusting the hook size and yarn weight, allowing you to create a petite panda or a larger cuddly companion. Experiment with different dimensions to suit your crafting desires.
-
Accessory Addition: Add a small scarf or hat for seasonal variations, personalizing the panda for different occasions. Imagine your panda rocking a cozy scarf in the winter!
-
Texture Tweaks: Incorporate a fluffy bobble stitch in a few areas for a whimsical look. This will create delightful texture that you'll want to touch!
-
Color-Blocking Fun: Play with color blocking by creating a two-tone panda using vibrant hues that contrast beautifully with classic colors. Let your imagination run wild!
-
Facial Expression Variants: Craft different eyes and mouth shapes to evoke a range of emotions, turning your panda into a shy friend or a playful buddy. This simple tweak can bring an entirely new personality to life.
-
Fringe or Pom-Poms: Add fringe or a cheerful pom-pom on the panda's head for an extra whimsical touch, making your crochet creation even more delightful!
Cute Panda Crochet FAQs
Can I use a different yarn type for this panda crochet project?
Absolutely! While the pattern suggests medium-weight acrylic yarn for a soft texture, you can swap it for cotton yarn if you prefer a crisper finish. Just be mindful that this may slightly alter the size and feel of your finished panda.
How can I make my panda crochet bigger or smaller?
To adjust the size, you can change your yarn weight and hook size. For a larger panda, use a bulkier yarn with a corresponding larger hook. Conversely, if you want a smaller version, go with a finer yarn and a smaller hook. Just remember to check your gauge to maintain consistent stitches!
Why is my work curling as I crochet?
Don't panic! Curling often happens if your tension is too tight or you're using a hook that's too small for the yarn. Try loosening your grip, using a larger hook, or checking your stitch counts to ensure you're following the pattern correctly. A gentle tug of the stitches can also help smooth things out.
What size hook should I use for this project?
The recommended hook size for the cute panda crochet is a 2.5 mm (US C-2), which is perfect for achieving the right tension. If you’re using a different yarn that changes the thickness or feel, you may want to adjust the hook size accordingly. Always test with a swatch first!
I’m having trouble with dropped stitches, what should I do?
It's an easy fix! If you notice a dropped stitch, simply use your yarn needle to gently weave the stitch back into place. If it's a significant issue, you might consider frogging back to the last row where the count was correct and retrying to avoid future trouble.
How do I know if I’m counting my stitches correctly?
Keeping track of your stitch count is key! After every round, double-check your total stitch count before moving on. It’s helpful to use a stitch marker at the start of each round. If you’re ever in doubt, counting once again can save you from any shape distortions later on.
Leave a Reply