
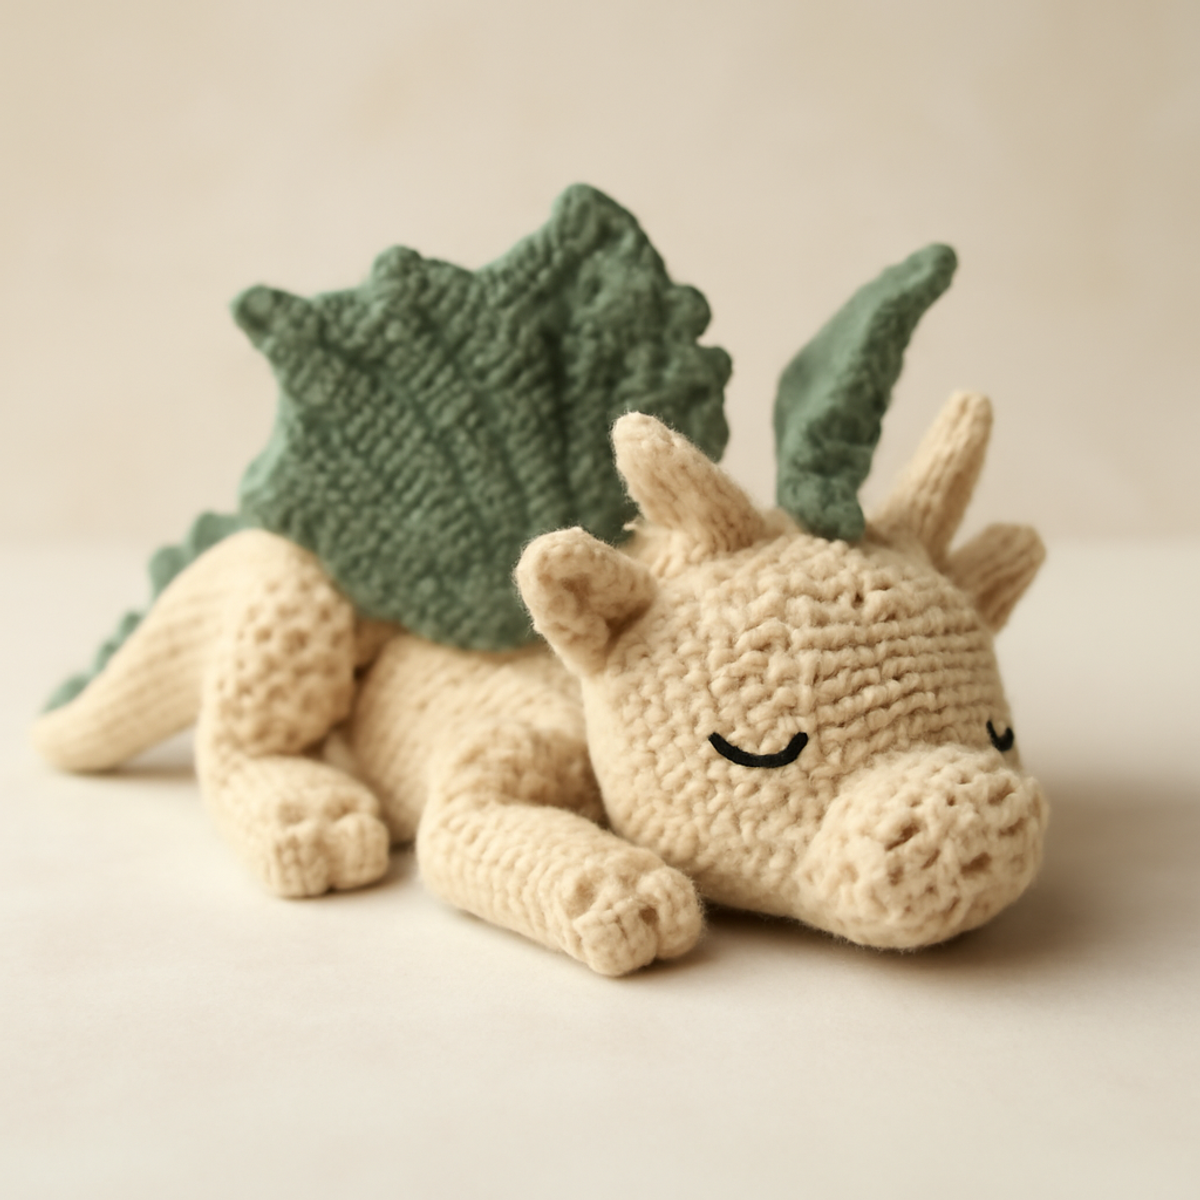
In the midst of a busy week, I found solace in my yarn stash, drawn to a soft cream and sage green that whispered cozy vibes. With each stitch, I was transported into the magical world of my "Dreamy Sleepy Dragon Amigurumi." This charming pattern is not just a fun challenge for intermediate crocheters; it brings to life a delightful plush toy that can sparkle in a child's toy collection or serve as a whimsical decoration. Working on this sleepy dragon crochet will not only sharpen your amigurumi skills but also reward you with a cuddly creation that makes the perfect gift for any celebration. Are you ready to embark on this enchanting crafting adventure? Let’s dive in!
Sleepy Dragon Crochet Materials & Tools
- Plush or Chenille Yarn – Use cream for the body and sage green for the wings; approximately 200-300 yards is needed.
- 5.0 mm (H-8) Crochet Hook – Ideal for achieving the soft, plush texture of your sleepy dragon crochet.
- Safety Eyes (10 mm) – Perfect for adding that adorable, sleepy look to your dragon.
- Polyester Stuffing – Essential for creating a huggable and comfy feel for your dragon.
- Yarn Needle – Necessary for assembly and weaving in those pesky ends.
- Scissors – Handy for trimming threads and maintaining your work as you go.
Gather these supplies, and let your crafting adventure begin with your delightful sleepy dragon!
Why is this Sleepy Dragon Crochet So Special?
Whimsical Charm: This cozy creature adds a touch of fantasy to any room, capturing hearts at first glance.
Challenging Yet Approachable: Designed for intermediate crafters, it strikes the perfect balance between fun and skill-building.
Comforting Plush Texture: Crafted from soft yarn, this dragon is not only adorable but also huggably warm.
Unique Gift Idea: Perfect for birthdays or baby showers, this handmade toy will be cherished for years to come.
Creative Customization: Mix and match colors to create your unique dragon while honing your amigurumi skills.
Gauge & Sizing Notes
Don't skip the gauge swatch! Checking your tension is vital when creating your sleepy dragon crochet to ensure every adorable detail comes together perfectly. Aim for a standard gauge of 4×4 inches (10×10 cm) to achieve the ideal plush texture; you want your stitches to be cozy without being too tight or overly loose. If you're looking to make your sleepy dragon larger, increase your starting chain in multiples of 2 as needed. Conversely, if your swatch appears too small, gently switch to a larger hook size or adjust your yarn tension to get the right fit. Happy crafting, and enjoy bringing your dreamy dragon to life!
Step-by-Step Pattern for Dreamy Sleepy Dragon Amigurumi
Row 1: Start the Head
Begin with a magic ring, and work 6 sc into the ring (6 sts). Pull the magic ring tight to close. Your work should form a small round shape.
Row 2: Increase for the Face
Work 2 sc in each stitch around (12 sts). This will start to create a fuller head shape. Your circle should now appear wider and more pronounced.
Row 3: Continue Increasing
Sc in the first stitch, inc in the next—repeat around (18 sts). You will notice that the circle begins to bulge slightly, which is ideal for the dragon’s round face.
Row 4: Shape the Head
Sc in the first 2 sts, inc in the next—repeat around (24 sts). Your work is growing, and at this point, it should nicely cup and create the basic face shape of your sleepy dragon crochet.
Row 5: Begin the Body
Switch to the body by continuing with 1 sc in each stitch around (24 sts). This section helps form a nice cylindrical shape as you progress down from the head.
Row 6: Create Body Rounds
Sc in the first 3 sts, inc in the next—repeat around (30 sts). You will see the body starting to take a more rounded and plush form.
Row 7: Continue the Body
Work 1 sc in each stitch around (30 sts). This round will maintain the body’s shape and prepare you for subsequent shaping.
Row 8: Increase for Curvature
Sc in the first 4 sts, inc in the next—repeat around (36 sts). The dragon's body should now feel more pronounced and begin to appear adorable and plump.
Row 9: Define the Base
Work 1 sc in each stitch around (36 sts). At this point, the body of your sleepy dragon crochet is becoming substantial and will support the limbs nicely.
Row 10: Start Decreasing
Sc in the first 4 sts, dec in the next—repeat around (30 sts). This decrease will help narrow down your dragon's body as you prepare to finish shaping.
Row 11: Continue Decreasing
Sc in the first 3 sts, dec in the next—repeat around (24 sts). Your body will start to taper, giving it the cozy toy shape characteristic of amigurumi.
Row 12: Final Round for Body
Work 1 sc in each stitch around (24 sts). Stuff the body lightly with polyester stuffing as you go, ensuring it retains its plush feel.
Step 1: Make the Arms and Legs
Start each limb with a magic ring, and work 6 sc into the ring (6 sts). Repeat this for both arms and legs, ensuring you maintain the same stitch count for consistency.
Step 2: Increase for Limbs
Sc in each stitch around (6 sts), then sc in the first stitch, inc in the next for all rounds of limbs (8 sts). This will give the limbs a rounded look that complements the overall dragon shape.
Step 3: Shape the Wings
For the wings, start by chaining 6, then in the 2nd ch from the hook, work 1 sc, 1 hdc, 1 dc, and 1 dc in each of the following stitches. Your work will start developing a wing shape (4 sts).
Step 4: Add Wing Details
Ch 4, 1 sl st in the next sc along the bottom edge of the wing for texture. Repeat on the second wing. Your wings should look textured and feel dimensional, adding character to your sleepy dragon crochet.
Step 5: Create the Tail
Begin with a magic ring, work 6 sc in the ring, and then continue for 10 rows of 6 sc to taper. The tail should be slender and sleepily curled, contributing to the dragon's whimsical luck.
Step 6: Work on Spikes
Chain 5, turn, and work 1 dc in the second ch from the hook, 1 hdc, and 1 sc. Fasten off. Your spikes should be slightly pointed and will add a fun feature along the dragon's back.
Step 7: Assembly
Attach the head to the body using a yarn needle, securely weaving through the stitches. Then, arrange and sew on the arms, legs, wings, tail, and spikes. Your sleepy dragon crochet is coming together, showcasing each unique piece in harmony.
Step 8: Final Touches
Embroider facial features, and securely attach safety eyes. Ensure that all seams are tight, and no stuffing is visible. Set aside for a moment and admire your completed magical creation—a true testament to your crafting journey!
What to Pair with Dreamy Sleepy Dragon Amigurumi
Crafting your charming sleepy dragon unlocks a path to an entire world of playful creations that can harmonize beautifully together.
- Cozy Dragon Blanket: This plush blanket will embrace your creations in warmth, perfect for cuddling under during storytime.
- Charming Dragon Scarf: A whimsical scarf featuring dragon scales can add adventure to any outfit, pairing perfectly as a children's accessory.
- Sleepy Dragon Pillow: Capture the magic with a matching pillow that can complete the enchanting atmosphere of a cozy nook.
- Dragon-Themed Keychain: A mini version of your sleepy dragon makes for adorable keychains that can spread joy wherever you go.
- Whimsical Friends: Create other mythical creatures like unicorns or griffins in coordinating colors, expanding your imaginative plush collection.
- Amigurumi Accessories: Consider crafting whimsical hats or capes to complement your sleepy dragon, perfect for imaginative play and storytelling.
How to Wash and Care for Your Sleepy Dragon Crochet
Machine Washing: Use a gentle cycle with cold water and a mild detergent. Place your sleepy dragon crochet in a mesh laundry bag to protect its plush shape during the wash.
Hand Washing: If you prefer a gentler approach, fill a basin with cold water and a teaspoon of soap. Gently submerge your dragon, avoiding agitation to prevent felting or pilling.
Drying: Lay your dragon flat on a clean towel to dry. Reshape as necessary, ensuring it retains its adorable form without hanging, which can stretch its structure.
Storage: Keep your sleepy dragon crochet in a cool, dry place away from direct sunlight. This ensures it stays cuddly and vibrant for all those cozy adventures!
Sleepy Dragon Crochet Variations
Explore the delightful world of customization with your very own sleepy dragon crochet! Each stitch is an opportunity for creativity and personal expression.
-
Yarn Weight Swaps: Opt for a lighter worsted yarn for a petite dragon or bulky yarn for a cuddly giant.
-
Color Combinations: Experiment with pastel shades for a whimsical touch or bold jewel tones to create a regal dragon.
-
Fiber Alternatives: Use cotton yarn for a sturdier dragon; it gives a fun, textured finish perfect for playtime.
-
Textured Wings: Introduce ripple stitches or bobble designs for the wings, adding eye-catching dimensions that dance in the light.
-
Tail Variations: Try a spiral design for the tail, enhancing its quirky charm and adding a playful twist to your dragon's look.
-
Size Adjustments: Change your crochet hook size—use a smaller hook for a detailed, snug dragon, or a larger one for a looser, fluffier version.
-
Embellished Features: Personalize the facial features with unique embroidery, such as sleepy eyelashes or cheerful cheeks to give your sleepy dragon a signature look.
-
Add Accessories: Attach a tiny scarf or a whimsical hat to make your dragon adorably unique and full of character!
Dive into these variations and let your imagination soar; your sleepy dragon crochet can be as unique as you are!
Helpful Tricks for Sleepy Dragon Crochet
-
Watch Your Tension: Consistent tension is crucial; too tight will create a stiff dragon, while too loose could lead to gaps. Aim for a comfortable, even stitch.
-
Count Your Stitches: Use a stitch marker at the beginning of each round to avoid losing count and ensure a well-shaped dragon body throughout the sleepy dragon crochet.
-
Stuff As You Go: Lightly stuff each piece as you finish it to prevent overstuffing later, ensuring your dragon remains cuddly and maintains its shape.
-
Secure All Parts: When attaching limbs and features, use a whip stitch to secure them tightly. This adds durability and prevents any parts from falling off after play.
-
Final Finishing Touches: After assembly, give your dragon a quick inspection. Make sure all ends are weaved in and that safety eyes are attached securely for when little hands are playing with your dragon.
Dreamy Sleepy Dragon Amigurumi FAQs
Can I use a different type of yarn for my sleepy dragon crochet?
Absolutely! While plush or chenille yarn is recommended for a soft and cuddly texture, you can switch to cotton yarn for a sturdier feel. Just be aware that the finished toy will have a different aesthetic and firmness.
How can I adjust the sizing of my sleepy dragon crochet?
If you want to make your dragon larger, consider using bulkier yarn or increasing your hook size. Conversely, if you prefer a smaller dragon, use a lighter weight yarn and a smaller hook. Just remember to check your gauge to ensure everything turns out as expected!
Why does my work keep curling?
Don't panic! Curling can happen if your tension is too tight. Ensure your single crochet stitches are relaxed and consistent, and keep an eye on your stitch count as you proceed. If it continues, you may need to ease your tension or adjust your hook size.
I dropped a stitch while crocheting my dragon; how do I fix it?
It’s an easy fix! Simply locate the dropped stitch and use your crochet hook to pick it back up, following the original stitch's pattern. If you're unsure, you can always rip back a few stitches to make sure it aligns correctly.
What hook size should I use for my sleepy dragon crochet?
For this project, a 5.0 mm crochet hook (H-8 US size) works perfectly to achieve the desired plush texture. If you’re switching yarn types or weights, double-check your gauge to determine if you need to adjust the hook size for your finished project.
How do I ensure the safety eyes stay in place?
To securely attach safety eyes, press them through the material tightly, ensuring they lock in place. For extra security, you can add a small dab of glue to the back of the eye posts before securing them, especially if this dragon is intended for a child.
Leave a Reply