
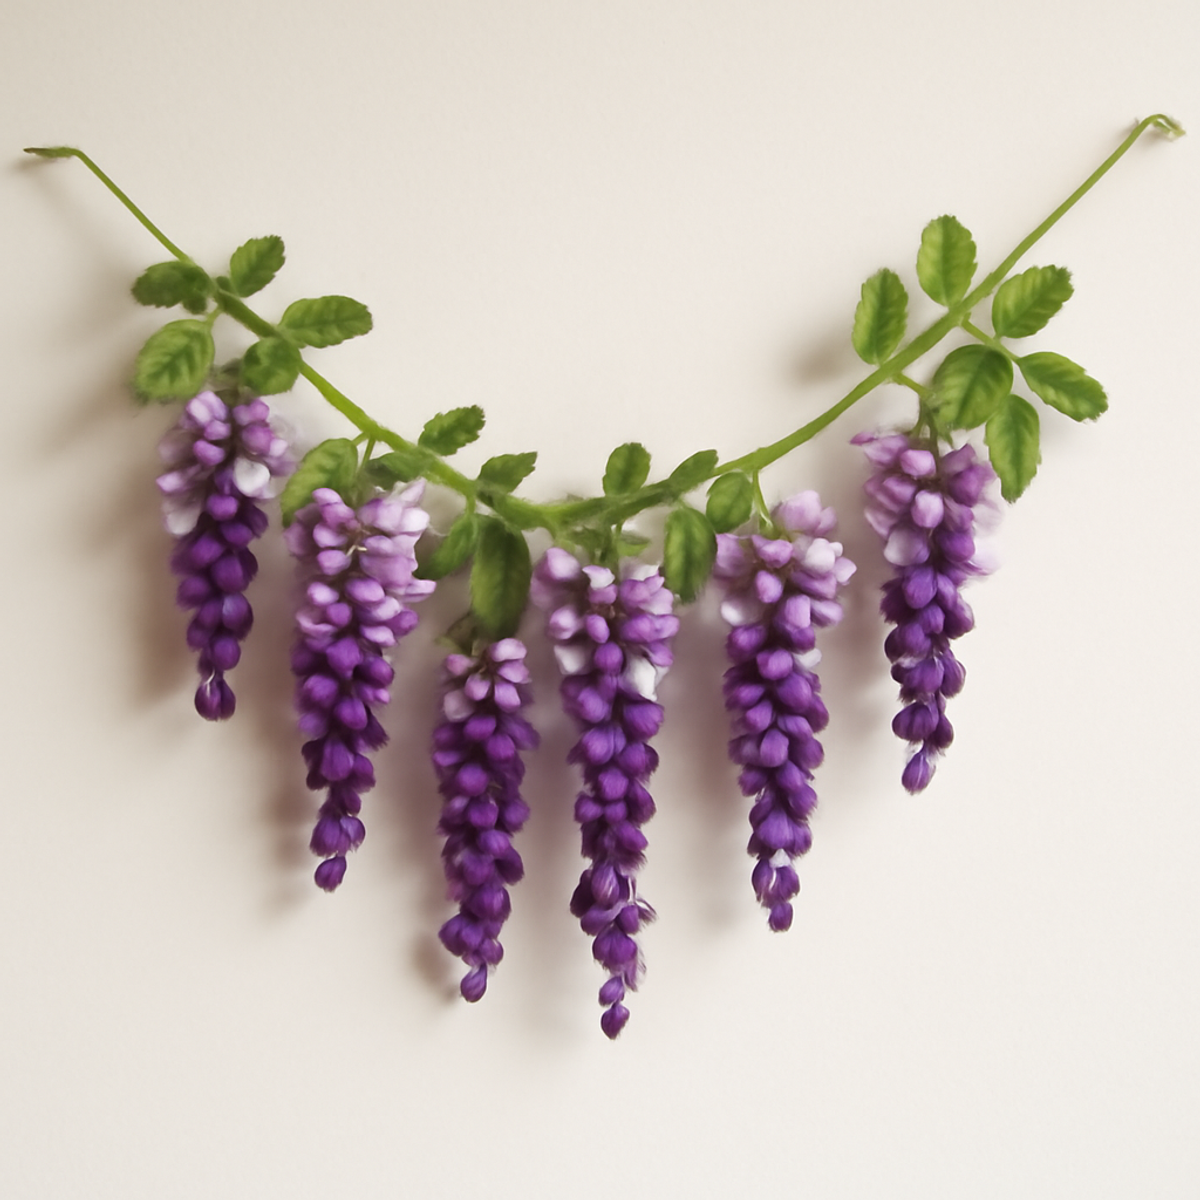
As I settled into my favorite cozy corner, the soft touch of cotton yarn slid through my fingers, bringing to life a breathtaking crochet wisteria garland. This charming project not only infuses your home with the essence of spring but also lets your creativity blossom through vibrant color choices. Crafting this stunning garland allows you to refine your crochet skills while offering the satisfying challenge of intricate flower and leaf designs. With its lightweight drape and moderate density, this garland enhances any space without overwhelming it. Whether you’re adorning a wall for a cozy gathering or just brightening your everyday living, you’ll find that each stitch brings joy and beauty into your surroundings. Ready to let your imagination run wild and create something truly special? Let’s dive into this enchanting journey together!
Crochet Wisteria Garland Materials & Tools
Yarn
- DK Cotton Blend Yarn – Approximately 300-400 yards in shades of purple and green for a lovely floral touch.
Tools & Notions
- 3.5 mm (US E/4) Hook – Ideal for achieving the right tension for the delicate flower and leaf details.
- Yarn Needle – Perfect for weaving in ends and finishing off your crochet wisteria garland.
- Scissors – Essential for trimming excess yarn as you complete your project.
- Stitch Markers – Helpful in distinguishing sections while working on the leaves for better organization.
Why is the Crochet Wisteria Garland Unique?
Intricate Design: This project showcases beautiful flower and leaf details that provide a captivating challenge for intermediate and advanced crocheters.
Floral Aesthetic: Perfect for spring-themed decor, the wisteria garland adds a touch of nature indoors, transforming any space into a vibrant oasis.
Versatile Color Choices: With a range of colors available, you can personalize the garland to suit your style, from traditional purples to playful pastels.
Lightweight Drape: The combination of cotton yarn and strategic stitch selection results in a lovely flow that hangs beautifully, complementing any room without looking bulky.
Creativity Unleashed: Each cluster of flowers not only enhances aesthetic appeal but also empowers you to express your artistic flair, making this a gratifying project you'll love to showcase.
Gauge & Sizing Notes
Don't skip the gauge swatch! Checking your tension is crucial for creating your crochet wisteria garland, as it ensures each flower and leaf has the desired size and shape. While the exact gauge will depend on your crochet style, a general rule of thumb is that your tension swatch should measure approximately 4×4 inches (10×10 cm) and contain a similar stitch count that allows the flowers to drape beautifully. To scale your garland larger or smaller, adjust your starting chain in multiples of 6. If your swatch is too small, try using a larger hook size; if it's too big, go down a hook size for the perfect fit!
Step-by-Step Pattern for crochet wisteria garland
Row 1: Create the Vine
Ch 200 to form the base vine for your crochet wisteria garland. In the second ch from the hook, work 1 sc, and then continue to sc across each ch. This will create a sturdy foundation while ensuring your work is flat. When finished, your vine should be approximately 200 sts, showcasing a neat edge to support the flowers.
Row 2: Building the Vine Structure
Ch 1, and turn your work. Work 1 sc in the first st and then 2 sc in each of the next 7 sts to create a slight curve in your vine. Continue by working 1 sc in each of the next 180 sts until you reach the end. Your work should slightly cup to form the base for attaching flowers later (188 sts total).
Row 3: Floral Petals Setup
To begin the wisteria flowers, make a magic circle and ch 4 (counts as the first tr). In the circle, work 2 tr, 1 dc, 1 hdc, and 1 sc to form the first flower petal. Pull tight on the magic circle to secure, then sl st to join. You should have 5 petals formed, creating the base of your wisteria flower.
Row 4: Flower Petal Detail
Continue with the next flower by repeating the magic circle method. This time, work 3 tr, 2 dc, and 1 hdc into the magic circle. After closing it with a sl st, your flower should have a more substantial and intricate crown of petals, creating 2 flowers with varying textures that provide interest to the crochet wisteria garland.
Row 5: Attaching Flowers
Once you have a few flowers created, sl st them directly onto the vine at evenly spaced intervals. Secure each flower by working 1 sl st in the vine after placing it, ensuring they cascade naturally. Aim for at least 5 flowers on the vine, allowing your work to start taking shape as a lively garland.
Row 6: Create the Leaves
For the leaves, ch 10 and in the second ch from the hook, work 1 sc, 1 hdc, and 1 dc into the next 2 sts (total of 6 leaves). This will provide the depth needed for the foliage around your wisteria flowers. By the end, your leaves should add a lovely green touch that complements the floral elements beautifully.
Row 7: Attaching Leaves
Your garland will look fuller as you attach leaves by slip stitching them in between flowers along the vine. Position them so they appear to burst from behind the flowers. Aim to attach around 10 leaves throughout your work, creating visual fullness and enhancing the floral aesthetic of your crochet wisteria garland.
Row 8: Final Touches
Once all flowers and leaves are attached, weave in any loose ends using your yarn needle, ensuring a clean finish. Consider blocking your crochet wisteria garland after completion to achieve defined shapes and a polished look. The final dimensions should drape beautifully around 4-5 feet in length, ready to bring a touch of elegance to any space!
Expert Tips for Your Wisteria Garland
-
Tension Matters: Maintaining consistent tension while crocheting each flower and leaf ensures uniform sizes. Consider using a blocking technique for cleaner shapes.
-
Count Regularly: To keep your flowers aligned on the vine, regularly count your stitches as you work. This practice helps avoid misalignment and ensures a beautiful finished look.
-
Stitch Markers: Use stitch markers while creating leaves to easily differentiate sections. This will simplify your process and help prevent losing count amidst the intricate details.
-
Foundation Check: Ensure your chain foundation for the vine is flat and without twists before starting. A twisted foundation can lead to an uneven appearance in your crochet wisteria garland.
-
Finishing Touches: Don’t forget to weave in any loose ends with a yarn needle for a polished look. This step elevates the overall presentation of your piece!
Care Instructions for Crochet Wisteria Garland
Machine Washing: Use a gentle cycle in cold water to preserve the integrity of the intricate flowers and leaves. Avoid agitation to prevent any felting or pilling.
Hand Washing: For best results, immerse your crochet wisteria garland in lukewarm water and a mild detergent. Gently swish, then rinse thoroughly to maintain its delicate shape.
Drying/Blocking: Lay flat on a clean, dry towel to reshape and air dry. Avoid hanging, as this can distort the lovely flow of your garland.
Storage: Store your finished crochet wisteria garland in a cool, dry place, preferably in a breathable bag or box, to avoid any crushing or damage.
What to Pair with Your Crochet Wisteria Garland
Creating a harmonious collection of crochet pieces can elevate your decor and inspire your next crafting adventure.
- Charming Crochet Coasters: These delightful coasters add a splash of color, echoing the floral theme of your garland while protecting your surfaces.
- Floral Wall Hanging: A beautifully textured hanging that captures the essence of your wisteria, bringing more dimension to your wall art.
- Matching Crocheted Pillow: Create a cozy pillow featuring similar floral motifs, perfect for tying your space together with comfort and style.
- Wisteria-Inspired Table Runner: This project extends your floral theme to the dining area, ideal for hosting gatherings and showcasing your talents.
- Crochet Flower Bunting: Crafting a cheerful bunting with smaller floral designs will harmonize beautifully with your wisteria garland, perfect for special occasions.
- Lush Crochet Plant Hanger: This unique addition can hold your beloved plants, incorporating more greenery that pairs beautifully with the floral aesthetic of your garland.
Crochet Wisteria Garland Variations
Feel inspired to customize your crochet wisteria garland and make it truly yours with these delightful twists!
-
Yarn Weight Swaps: Switch to a lighter sport weight for a more delicate look. This’ll create an ethereal garland perfect for summer decor.
-
Fiber Alternatives: Experiment with bamboo yarn for a lustrous sheen. The natural fibers will enhance the floral aesthetic while offering a unique texture.
-
Color-Blocking: Create clusters of colors by working each flower in different tones. A sunset palette featuring yellows, oranges, and pinks can evoke warmth and joy.
-
Sizing Adjustments: Increase the number of flower motifs for a longer garland or opt for thicker yarn to craft a bold statement piece. Both variations showcase the beauty of the design!
-
Texture Modifications: Add playful pom-poms or fluffy yarn accents to the flowers for extra whimsy. Tiny embellishments can bring a touch of fun to your project.
-
Embellishments: Using beads or sequins in the center of the flowers can add a sparkly dimension, transforming your garland into a true showstopper.
-
Leaf Variations: Try crocheting leaves in varying shades of green for depth. This’ll create a more dynamic look that mimics the natural beauty of wisteria.
-
Seasonal Themes: Change up the color scheme to fit different holidays, like vibrant reds and greens for Christmas, or pastels for Easter. Tailoring it for occasions keeps your decor fresh year-round.
Crochet Wisteria Garland FAQs
Can I substitute the yarn for my crochet wisteria garland?
Absolutely! While a DK cotton blend is recommended for durability and softness, you can substitute it with acrylic or bamboo yarns. Just remember that different fibers may affect the drape and texture, so it’s a good idea to check your gauge.
How can I make my crochet wisteria garland bigger or smaller?
If you wish to adjust the size, simply increase or decrease the number of flower motifs you create! For a more substantial garland, consider using thicker yarn or adding more flowers and leaves. Each flower can be made larger by adding more stitches in the magic circle if you desire a bolder look.
Why is my work curling up?
Don't panic! If your garland is curling, it might be due to tight tension or not completing the necessary stitches for each flower or leaf properly. Try blocking your finished project to smooth it out, and ensure you’re maintaining consistent tension throughout your work.
How do I fix dropped stitches in the flowers?
It’s an easy fix! Simply pull the working yarn to the point of the dropped stitch, then use a yarn needle to thread it back through the missing stitch to secure it. If there are multiple dropped stitches, you may want to unpick a few rows back and re-crochet.
What size hook should I use?
For this crochet wisteria garland, a 3.5 mm (US E/4) hook is recommended. This size will help you achieve the delicate nature of the flowers and leaves further allowing proper tension. If you wish to use a different yarn weight, adjust your hook size accordingly based on the yarn's label to maintain the intended gauge.
Leave a Reply