
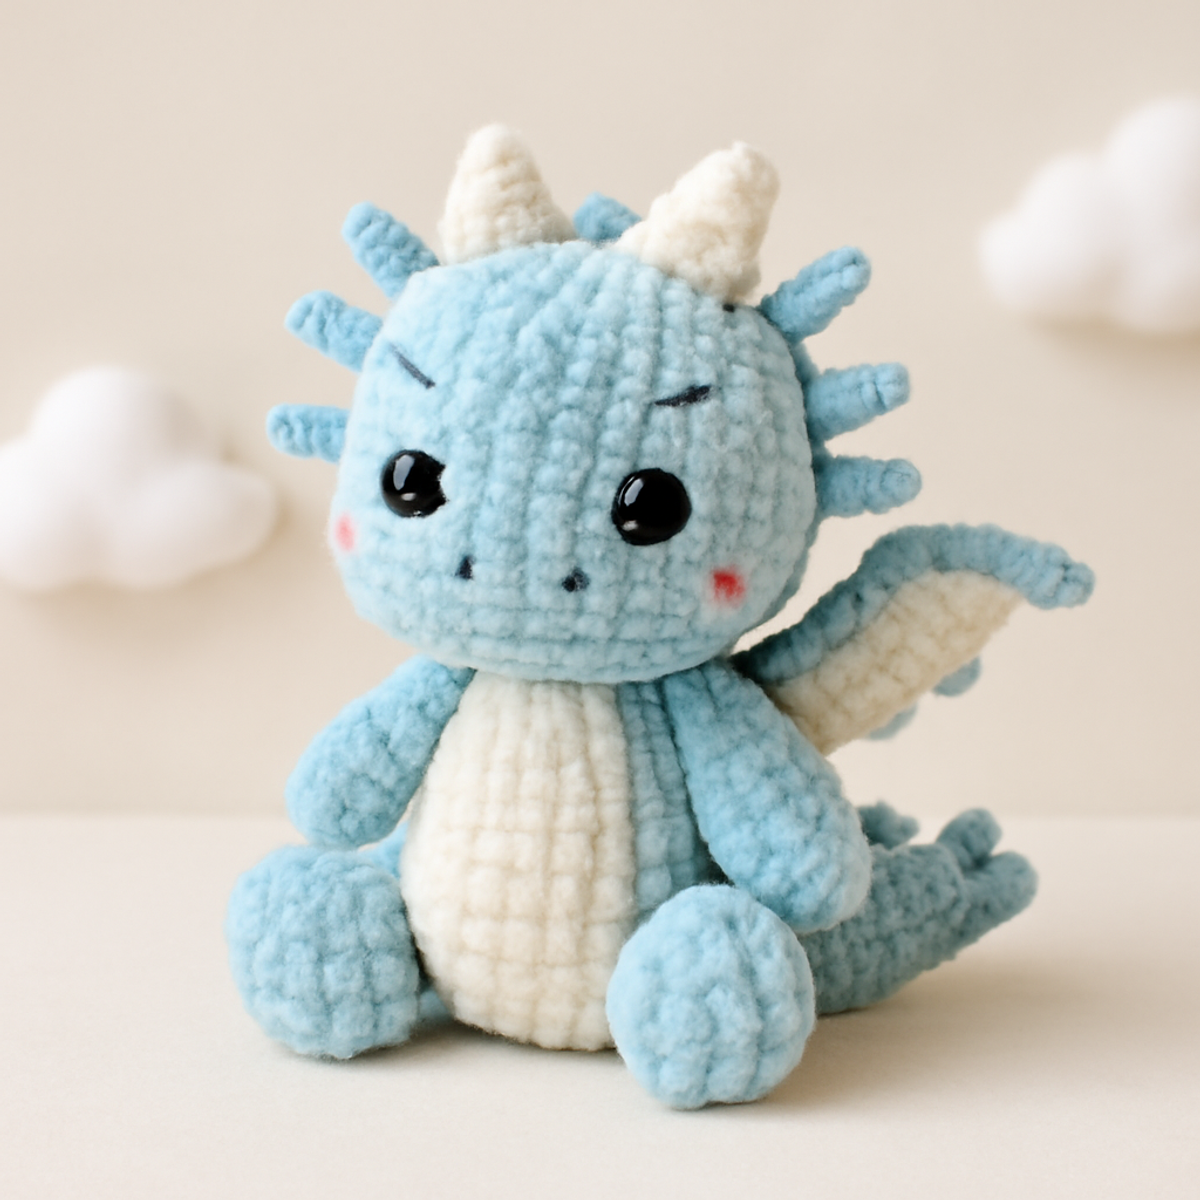
As I settled into my cozy corner, the soft, plush yarn slipped through my fingers, transporting me into a whimsical world where clouds come alive as playful little dragons. Introducing the Dreamy Cloud Dragon amigurumi—a crochet project that invites you to explore your creativity while mastering intricate yet enjoyable stitches. This charming creature features delightful textured wings and an adorable face that’s sure to capture hearts, making it a fantastic gift or a delightful decorative piece for any space. Plus, it works up quickly, allowing you to indulge in the joy of crafting without long hours of commitment. Whether you’re an intermediate crocheter or looking to level up your skills, this cloud dragon crochet project is sure to spark excitement. Ready to dive into this enchanting adventure? Let’s start stitching!
Cloud Dragon Crochet Materials & Tools
Gather your supplies for a whimsical adventure!
Yarn
- Plush or Chenille Yarn – Use light blue, sky blue, cream, and blush pink for the vibrant colors of your cloud dragon.
- Yardage – Approximately 150-200 yards should be sufficient for this project.
Tools & Notions
- 4.0 mm (G-6) Crochet Hook – This size is perfect for achieving the ideal tension with the plush yarn.
- Safety Eyes (10 mm) – These add expressiveness to your dragon's charming face, making it all the more endearing.
- Stuffing Material (Polyester) – Ensure your dragon has that huggable quality by filling it up nicely.
- Scissors – A must-have for trimming yarn and making those precise cuts!
- Yarn Needle – Essential for the assembly of your cloud dragon crochet project.
Why Love the Cloud Dragon Crochet?
Whimsical Charm: The Dreamy Cloud Dragon captures the playfulness of childhood imagination, making it a delightful addition to any collection or gift.
Textured Wings: Featuring textured wings that invite tactile exploration, this design challenges your skills while ensuring a fun crafting experience.
Quick to Create: With its straightforward instructions, this pattern allows even intermediate crocheters to finish quickly, making it perfect for last-minute gifts.
Soft & Cuddly: The use of plush yarn ensures that the final dragon is huggable and perfect for both children and adults alike.
Customization Options: Easily personalize your dragon by altering colors or sizes, giving you the freedom to let your creativity shine while crafting!
Gauge & Sizing Notes
Don't skip the gauge swatch! Achieving the correct tension is vital for your cloud dragon crochet project, as even slight differences can affect the final size and shape of your whimsical creation. A standard gauge for this project is approximately 4×4 inches (10×10 cm), which generally translates to about 12 single crochets by 12 rows; however, be sure to verify your own measurement for best results. If you wish to customize the size of your cloud dragon, adjust your starting chain in multiples of 6 + 2. If your gauge swatch turns out too small, simply try increasing your hook size for a looser tension. Happy crocheting!
Step-by-Step Pattern for cloud dragon crochet
Row 1: Start the Head
Begin with a magic ring (MR) and work 6 single crochets (sc) into the ring, pulling it tight to close. This sets the foundation for the head of your cloud dragon crochet. Your first row will form a small circle, which should begin to cup slightly as you work (6 sts).
Row 2: Increase Rounds
Continue in the round by adding increases. Work 2 sc in each stitch around. This will create a fuller head shape, giving the dragon a more rounded appearance. By the end of this round, your head should begin to puff out and measure approximately an inch across (12 sts).
Row 3: Shaping the Head
For this row, crochet 1 sc in the first stitch, followed by an increase (2 sc in the next stitch). Repeat this pattern around for a total of 18 stitches. This gradual shaping is key in achieving the cloud-like form of the dragon's head (18 sts).
Row 4: Continue Shaping
In this round, you'll work 2 sc, followed by an increase in your next stitch. Repeat this sequence around, which will allow for a balanced form. You should see your head growing in size, bringing your dragon closer to life (24 sts).
Round 5: Complete the Head
Now, sc around without increases for three rounds. This step will ensure that the head has a sturdy base and begins to take shape. As you progress, the head should feel robust and hold its form nicely (24 sts each round).
Row 6: Begin the Body
Transition to the body by starting with a new yarn color if desired. Work 2 sc in the next stitch, then sc in the following 21 stitches. Finish with an increase. This marks the beginning of the body, gradually widening as the shape develops (26 sts).
Row 7: Continue Body
For the next row, crochet 1 sc in each of the first two stitches, followed by an increase. This will gently taper your cloud dragon body and give it a defined outline. Your work should be steadily increasing in size as you stitch (32 sts).
Row 8: Form the Body
Continue without increases this round. Sc around, ensuring your tension remains even. This portion will create a lovely, full body, and your cloud dragon crochet should be taking a more recognizable shape by now (32 sts).
Row 9: Shaping the Legs
Now it's time to create the legs! Work in the next 15 stitches, then place your first leg by making a small round of 6 sc. After completing the leg, join back to the body. This will make your dragon look more complete and functional (6 sts for the leg).
Row 10: Continue with the Second Leg
For the second leg, repeat the same procedure as you did for the first. This symmetry brings balance to your cloud dragon crochet, making it even more adorable (6 sts).
Row 11: Add Wings
To form the wings, attach yarn to the back of the body and chain 15. In the 4th chain from the hook, work a double crochet (dc), followed by additional dc in each chain to create a textured wing. You should have about 10 stitches in total. Fasten off and repeat for the second wing (10 sts per wing).
Step 12: Assembly
With all parts crocheted, begin assembling your dragon. Attach the head to the body securely with a yarn needle, ensuring stitches are hidden. Position the wings evenly on either side, sew the legs in place, and secure the safety eyes. Your cloud dragon crochet is nearly complete!
Step 13: Finishing Touches
Embroider a smiling face and nostrils to add charm to your dragon. Review your completed cloud dragon crochet for any loose ends, weaving them in for a polished finish. This delightful little creature is now ready to flutter its way into someone’s heart!
What to Pair with Dreamy Cloud Dragon Amigurumi?
Creating a charming little family for your whimsical creation is a delightful way to extend your crochet journey!
-
Fluffy Cloud Blanket: Crafting a cozy blanket in complementary colors will create a warm embrace for your dragon. Soft textures make it a perfect match.
-
Adorable Mini Dragons: Make a set of tiny dragons for a playful scene. Each smaller version can showcase different colors and expressions, enhancing your amigurumi collection.
-
Whimsical Dragon Accessories: Consider crocheting a tiny scarf or a themed hat. These accessories will add a personal touch, making your dragon even more unique and fun.
-
Cumulus Clouds Mobile: Create a dreamy mobile featuring fluffy clouds that can swaddle your dragon. This adds an enchanting vibe to a nursery or playroom ambiance.
-
Crochet Dragon Eggs: Design colorful amigurumi eggs to nestle alongside your cloud dragon. These can serve as sweet little companions in your whimsical world.
Cloud Dragon Crochet Customization Ideas
Dive into a world of creativity where you can shape your cloud dragon crochet into something uniquely yours!
-
Color Variations: Experiment with vibrant colors like lavender or deeper blues for a majestic look. Each choice adds a different fairy-tale vibe to your dragon.
-
Yarn Substitutions: Switch to cotton yarn for a more durable yet textural finish. This swap can transform your dragon into a chic household decoration.
-
Larger Size: Using a bulkier yarn can give you a larger, more huggable cloud dragon. Imagine a cuddly creature ready to be a child’s delightful companion!
-
Cozy Accessories: Consider adding a tiny scarf or even a hat. Accessories can bring personality and make your dragon stand out in any collection.
-
Textured Details: Add pom-poms to the end of each wing for a fun twist. This could bring whimsy while enhancing the overall look of your cloud dragon.
-
Fringed Wings: Attach fringe to the edges of the wings for a fluttery effect. This adds texture and makes each wing truly eye-catching!
-
Shape Adjustments: Adjust your stitches to create a flatter dragon for a different aesthetic. A dragon that lays gracefully can be a charming decoration.
-
Unique Features: Customize facial features with different safety eyes or embroidery styles. You can truly make your dragon feel like a personalized friend.
How to Wash and Care for Your Cloud Dragon Crochet
Machine Washing: Use a gentle cycle in cold water to protect the plush texture of your cloud dragon crochet. Avoid harsh agitation to prevent fuzzing.
Hand Washing: If preferred, gently hand wash in cold water with mild detergent. Squeeze lightly—don't wring—to maintain shape and avoid felting.
Drying/Blocking: Lay your dragon flat on a clean, dry towel to air dry. Avoid direct sunlight, as it can fade colors and affect the softness of the yarn.
Storage: Store your cloud dragon crochet in a cool, dry place. Keep it away from moisture to preserve its huggable charm and cozy appearance.
Expert Tips for Your Cloud Dragon Crochet
-
Maintain Tension: Consistency is key! Keep your tension uniform as you stitch to achieve a lovely, cohesive appearance for your dragon.
-
Track Your Stitches: Use stitch markers to help keep track of your rounds, especially in the complex areas like the body and wings. This will prevent you from losing count!
-
Final Blocking: Don’t skip blocking your finished pieces! It helps define the shapes, ensuring your wings look beautifully sharp and well-formed.
-
Secure Your Eyes: When attaching safety eyes, ensure they’re well-placed and secure to avoid any surprises later. Check their positioning before cutting and sewing!
-
Weave in Ends: Always weave in your yarn ends neatly. This not only looks polished but also prevents unraveling, keeping your cloud dragon crochet intact for years to come.
Dreamy Cloud Dragon Crochet FAQs
Can I use a different type of yarn for my cloud dragon crochet?
Absolutely! While plush or chenille yarn is recommended for the softness and texture, you can substitute with cotton yarn for a more durable option. Just keep in mind that the final appearance and cuddle factor may vary!
How do I adjust the size of my cloud dragon crochet?
To make your dragon larger or smaller, you can switch up the yarn weight. Lighter yarn will give you a smaller dragon, while thicker yarn will result in a larger version. Always check your gauge, especially if you're altering the size!
Why is my work curling while crocheting?
Don’t panic! Curling often happens if your stitches are too tight or if you’re using a hook that’s too small for your yarn. Try loosening your tension a bit or switching to a larger hook size to help flatten your work out.
What size hook should I use for the cloud dragon crochet?
I recommend using a 4.0 mm (G-6) crochet hook, which is ideal for achieving the perfect tension with plush yarn. If you find your stitches are too tight, consider using a slightly larger hook for a more comfortable experience.
What should I do if I drop a stitch?
It's an easy fix! Simply pick up the stitch with your crochet hook and work it back into place. If you’re not sure how to get it back without creating a mess, you can try using a yarn needle to weave it back through the loops gently.
Can I embellish my cloud dragon crochet with accessories?
Of course! Feel free to get creative by adding a tiny scarf, a different color for the wings, or even little hats. Personalizing your dragon not only makes it unique but also enhances its playful charm!
Leave a Reply