
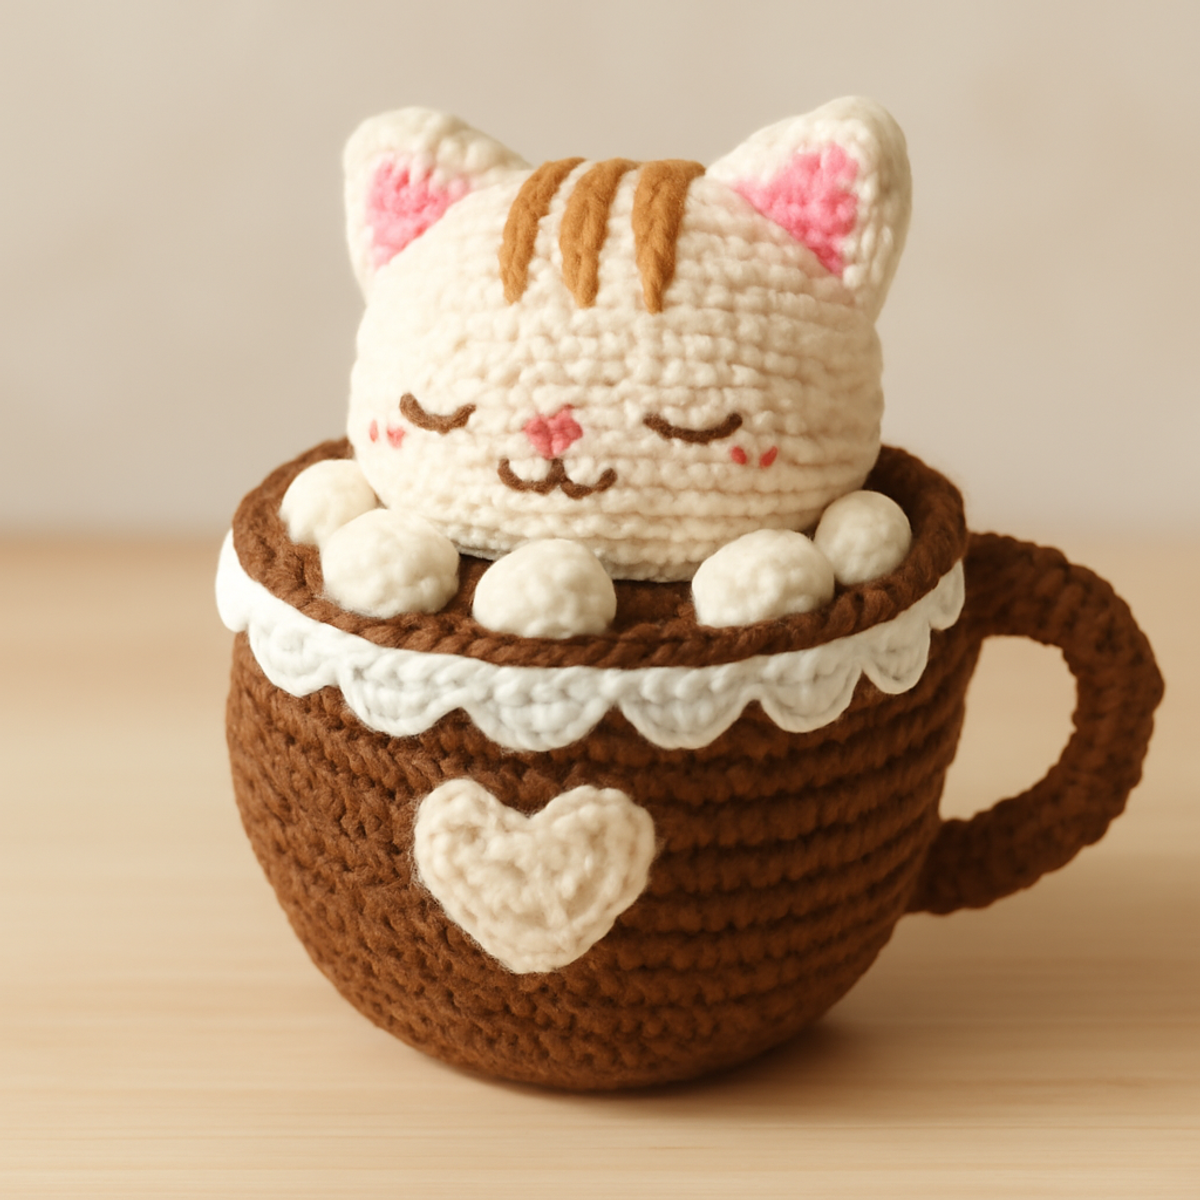
As I settled into my favorite corner of the couch, a cozy blanket draped over my lap, my thoughts wandered to the perfect handcrafted gift for a dear friend. Enter the 'Kitty in a Cup' crochet pattern, where whimsy meets charm in the most delightful way! This project is a treasure for both intermediate crafters seeking a fun challenge and beginners eager to stretch their skills. Not only does this adorable plush toy brighten any living space with its huggable softness, but it also transforms into a heartfelt gift that brings warmth and character to loved ones. With a few supplies and your trusty 5.0 mm hook, you’ll be well on your way to creating this enchanting piece. Ready to dive into a world of stitches and cuddles? Let's get started!
Crochet Kitty in Cup Materials & Tools
-
Yarn
- DK or Worsted Weight Yarn – Aim for a fiber blend of polyester or acrylic for durability, with not less than 150-200 yards needed.
-
Tools & Notions
- 5.0mm (H/8) Hook – This is the perfect size to achieve the soft and cuddly look for your crochet kitty in cup.
- Safety Eyes (10mm) – These will give your kitty a charming and friendly expression.
- Polyester Stuffing – Use this to ensure your cuddly creation is huggable and plush.
- Stitch Markers – Keep track of your rounds with these handy tools, especially when working with multiple components.
- Embroidery Thread (Brown and Pink) – Perfect for details, like the kitty’s facial features and the decorative elements on the cup.
Why is 'Kitty in a Cup' Special?
Whimsical Design: This pattern perfectly blends playful aesthetics with handcrafted charm, making it an eye-catching addition to any home decor.
Soft & Cuddly: The plush texture offers huggable warmth, making it an ideal gift for kids or anyone who loves soft toys.
Skill-Building Challenge: Perfect for intermediate crafters, this project helps you hone your crochet skills while keeping the fun alive.
Interactive and Engaging: Each step invites creativity and personalization—experiment with different colors and yarn textures for a unique touch.
Quick Project: With a manageable yardage of 150-200 yards, you can create this lovely plush in a timely fashion, making it a great quick gift.
Gauge & Sizing Notes
Don’t skip the gauge swatch! Ensuring your tension is just right is key to achieving the perfect fit for your cozy crochet kitty in cup. As a general guideline, aim for a 4×4 inch (10×10 cm) square to yield approximately 14 double crochets by 8 rows. If you want to make your kitty larger, simply increase your starting chain in multiples of 6 for the body or multiples of 4 for the cup. If your tension swatch is too small, don’t worry—try going up a hook size to adjust your stitches. Remember, a properly sized project enhances the charm of your adorable plush creation!
Step-by-Step Pattern for crochet kitty in cup
Row 1: Start the Head
Begin your crochet kitty in a cup by creating a magic ring. Work 6 sc into the magic ring (6 sts). Pull the ring tightly to close, ensuring a snug center. As you continue, this initial step establishes a solid base for the kitty's round head. Your work should now resemble a small circle.
Row 2: Increase for Shape
In this row, work 2 sc in each stitch around to begin shaping the head (12 sts). This will create a fuller look for your kitty. Remember to mark the beginning of your round with a stitch marker to keep track. You’ll notice the circle expanding, laying the groundwork for the plush toy.
Row 3: Build the Roundness
Now, crochet 1 sc in the next stitch, then 2 sc in the following stitch, repeating this sequence around the row (18 sts). This combination allows the kitty's head to begin taking form, adding to its lovable roundness. It should start appearing more like a cute plush sphere.
Row 4: Continue to Expand
For this round, work 2 sc in the first stitch, followed by 1 sc in the next 2 stitches, repeating this pattern (24 sts). As the rows build, you’ll see the head becoming more defined, cozying into its soft structure. Keep checking your stitch counts to maintain your work’s overall shape.
Row 5: Final Head Shaping
Crochet 1 sc in the next 3 stitches, then 2 sc in the following stitch (repeat around) (30 sts). Maintain even tension as you create this row. At this stage, the kitty's head should have a satisfying plumpness, setting the stage for the ears to come.
Row 6: Complete Head Dimensions
In this round, work 1 sc in the next 4 stitches followed by 2 sc in the next (repeat around) (36 sts). By now, your work will have a lovely round form, providing a firm foundation for the kitty’s features. The head should be quite full, preparing for those adorable ears!
Row 7: Start Ear Shaping
Transition to the ears by working 1 sc in the next 5 stitches and then 2 sc in the next stitch (repeat this around) (42 sts). After this round, you’ll observe the kitty’s head structure clearly emerging. The next section will focus on forming its sweet little ears.
Step 1: Create Ears (Make 2)
Begin each ear with a magic ring and crochet 6 sc into the ring (6 sts). After pulling the ring tight, you’ll have a small circle, which is essential for crafting the kitty's adorable ears. Repeat this step to create a second ear to ensure you have a pair.
Step 2: Increase Ears
For each ear, crochet 2 sc in each stitch around (12 sts). This increases the ear size, shaping a perfect whimsical form that adds to the charm of your crochet kitty in cup. They should start to take on a cute, pointy shape as you work.
Step 3: Finish Ears
Now, work 1 sc in the next stitch followed by a dec in the following stitch, repeating this pattern (8 sts) to taper the ears. This will give them a gentle peak, fitting perfectly atop your kitty's head. Fasten off, leaving a long tail for sewing later.
Step 4: Create the Body
Now it’s time to create the kitty’s body! Start with a magic ring and crochet 6 sc into it (6 sts). This is the base of the body. Remember to pull the magic ring tight, and your first stitch should be the foundation of your charming plush toy.
Step 5: Increase for Roundness
In this round, work 2 sc in each stitch around (12 sts). The body must have some roundness, so ensure every stitch is tight. Check your progress; your piece should feel fuller as you progress, setting a cozy shape for your kitty.
Step 6: Form the Body Shape
Next, crochet 1 sc in the next stitch, then 2 sc in the following stitch (repeat around) (18 sts). This step emphasizes the roundness that every kitty in cup needs, setting an even deeper base for the multiple rounds ahead.
Step 7: Continue Building Up
In this round, repeat 1 sc in the next 2 stitches and 2 sc in the next stitch uniformly (24 sts). As you crochet, the body should maintain a plump look, indicating a well-formed plush base for your kitty.
Step 8: Final Body Round
For the last body row, work 1 sc in the next 3 stitches, followed by 2 sc in the next (repeat) (30 sts). Your plush body is almost complete! It should feel nice and sturdy, the perfect spot for your kitty to sit in its whimsical cup.
Step 9: Begin the Cup
It’s time to make the cup! Start with a magic ring and crochet 6 sc (6 sts). This forms the bottom of your cozy kitty's cup. Ensure it’s tightly closed; you want that cup to be snug around your beloved kitty. Your magic ring will be the perfect base.
Step 10: Widening the Cup
In this round, work 2 sc in each stitch around (12 sts). This structure is fundamental in establishing the cup’s shape, making it wider and supportive for your plush kitty. Your cup will settle beautifully into the form, creating a delightful look.
Step 11: Build More of the Cup’s Form
Continue working by alternating between 1 sc in the next stitch and 2 sc in the following (repeat) (18 sts). Progressing in this way ensures the cup edges will be cushy yet sturdy enough to hold the adorable kitty inside.
Step 12: Final Cup Shaping
For the final cup round, crochet 1 sc in the next 4 stitches and 2 sc in the next stitch (repeat) (30 sts). Your cup should now have a gorgeous, inviting appearance that perfectly complements your lovely kitty nestled inside.
Step 13: Drip Cream Tops
To create the cream topping, chain 10 and sl st in each chain back to the cup, then attach securely around the rim. This soft detail adds to the whimsy of your crochet kitty in cup, mimicking the delightful look of a dessert topping.
Step 14: Assembling the Kitten
Now it's time to assemble your project! Use the tail of your yarn to sew the head onto the body securely, and position the ears on top as desired. Ensure everything is well secured, and nicely centered, completing the adorable look of your kitty.
Step 15: Finishing Touches
Sew in safety eyes securely on the kitty's head and embroider a sweet face using the brown and pink embroidery thread. This will bring your plush beauty to life! Make sure all ends are carefully tucked in and hidden, ensuring a neat finish.
Step 16: Final Assembly
Attach your finished kitty onto the cup with a few stitches to let them cozy up together. Adjust the placement nicely, ensuring your kitty is just right in its marshmallow base, showcasing the delightful results of your crochet kitty in cup!
Crochet Kitty in Cup Variations
Dive into a world of creativity as you customize your crochet masterpiece with these fun and charming ideas!
-
Cup Colors: Experiment with various colors, like pastels or vibrant shades, to make the cup really pop in your space. A whimsical touch can transform the overall look!
-
Alternative Yarn Types: Swap your usual yarn for chenille for an ultra-soft kitty or use cotton for a lightweight finish. Mixing textures can create a delightful visual contrast!
-
Size Adjustments: Use a thicker yarn or larger hook to create a more substantial plush. Kids will love a bigger huggable version to snuggle up to at storytime.
-
Patterned Stripes: Add playful colors and patterns for the kitty’s stripes—think sparkly yarn or ombre effects. This little twist could make your project truly one-of-a-kind!
-
Texture Enhancements: Incorporate faux fur for the kitty or a textured border on the cup. Touches like these add a cozy sense of whimsy to your finished piece.
-
Embellished Details: Consider adding a pom-pom or cute bow around the cup’s rim for an extra layer of charm. It’s the little details that bring your creation to life!
-
Personalized Features: Use embroidery to add a name or a special design on the cup, making it a heartwarming gift tailored to loved ones. A customized touch will always be cherished.
-
Seasonal Changes: Create variations for different seasons or holidays; a festive wrap around the cup or seasonal colors can make it a year-round delight!
How to Wash and Care for Your Kitty in a Cup
Machine Washing: Use cold water on a gentle cycle to clean your crochet kitty in cup, avoiding harsh agitation to prevent felting or pilling.
Hand Washing: For best results, hand wash your plush toy using mild detergent and cold water, gently pressing the fabric to clean without twisting or wringing.
Drying/Blocking: Lay the toy flat to dry, reshaping if necessary, and avoid direct sunlight which may fade colors. Blocking can help maintain its charming structure.
Storage: Store your finished piece in a cool, dry place, away from direct sunlight. This ensures that your kitty retains its softness and adorable charm for years to come.
Expert Tips for Crochet Kitty in Cup
-
Even Tension: Maintain a consistent tension throughout your work for a plush that holds its shape and looks professional. Loose stitches can result in a floppy toy.
-
Track Your Stitches: Use stitch markers or keep a tally of your rows to avoid losing counts, especially when moving between rounds—it can be easy to miscount during complex parts.
-
Secure Assembly: Pay special attention to the assembly phase; ensure all parts are tightly attached to prevent any wobbling or detachment of the kitty in the cup.
-
Finishing Touch: Don’t skip weaving in the ends neatly; this keeps your plush looking clean and polished. Tuck any loose threads securely to avoid future unraveling.
-
Block Your Work: Give your plush a light blocking before assembly to help shape and firm up the pieces, enhancing the finished look of your crochet kitty in cup.
What to Pair with Kitty in a Cup?
Imagine the joy of elevating your crafting experience by creating darling companions for your cuddly plush creation.
-
Mini Plush Mouse: A delightful addition that complements the whimsical theme, adding to your playful decor.
-
Crochet Cat Blanket: Snuggle up in style; its soft texture harmonizes with the cozy comfort of the toy.
-
Matching Cup Coaster: A small accessory that echoes the cup's design, perfect for making a charming gift set.
-
Whimsical Cat Keychain: This cute companion can add a pop of charm to your bag while keeping your crafting theme alive.
Crafting these additional pieces enhances your overall project and invites creativity into your crochet journey!
Kitty in a Cup FAQs
Can I use a different yarn than the recommended DK or worsted weight?
Absolutely! You can experiment with different yarn types, but keep in mind that using a heavier yarn may increase the overall size of your crochet kitty in cup. Just ensure you maintain an appropriate hook size to avoid losing the desired plush effect.
How do I adjust the size if I want a bigger or smaller kitty?
If you're looking to create a larger version, try using a heavier yarn or a larger hook size. Conversely, for a smaller version, opt for a lighter weight yarn and a smaller hook. Just remember to adjust your stitch counts accordingly as you go!
Why is my work curling at the edges?
Don't panic! This can often occur if your tension is too tight. I recommend checking your gauge before starting. If you notice curling during your project, try loosening your tension or adding a few more stitches to balance out the edge.
What should I do if I accidentally drop a stitch?
It's an easy fix! Simply locate the dropped stitch and use your crochet hook to pull it back up through the previous rows. If you're unsure, you can also secure it with a loose stitch until you reach a more convenient spot to fix it.
What hook size should I use for this pattern?
For the 'Kitty in a Cup,' I recommend a 5.0 mm (H/8) crochet hook. This size helps achieve the soft and cuddly look while keeping your stitches tight enough for a sturdy plush.
Can I mix different textures of yarn for the kitty and cup?
Absolutely! Mixing textures can add a unique charm to your crochet kitty in cup. Consider combining chenille for the kitty's body for added softness and cotton for the cup for a more structured feel. Just be mindful of the difference in stretch and drape.
Leave a Reply