
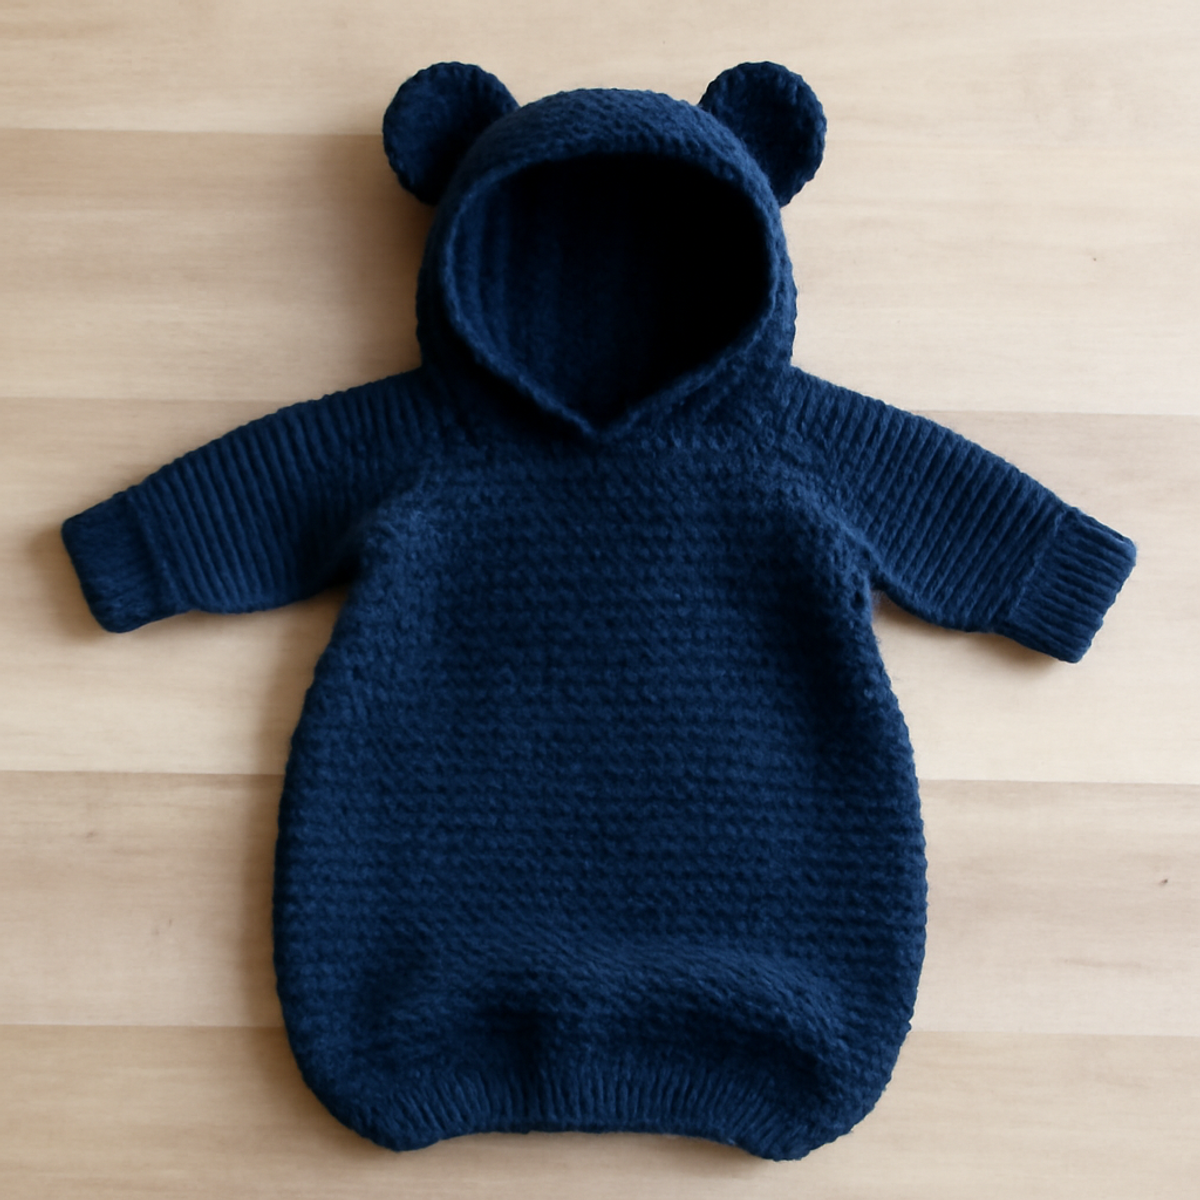
There’s nothing quite like the feel of soft yarn slipping through my fingers as I embark on a delightful crochet adventure. Today, I'm thrilled to share the pattern for the adorable Navy Bear Baby Sleeper, a whimsical piece that marries charm and functionality for your little ones. Perfect for keeping babies cozy during sleep or playtime, its bear ears add an irresistible touch of fun. Designed with intermediate crafters in mind, this project is not only a wonderful way to express creativity, but it's also a great opportunity to use up some of that beloved stash yarn. The result? A snug sleeper that will surely become a cherished favorite in any nursery. So, grab your yarn and hook, and let’s create something magical together!
Bear Baby Sleeper Materials & Tools
- Medium Weight Yarn – Approximately 300-400 yards of a soft acrylic or cotton blend for breathability and comfort.
- 5.0 mm (H) Hook – A perfect size for creating the snug and cozy texture of the sleeper.
- Stitch Marker – Use this handy tool to keep track of your rounds and ensure your stitches stay aligned.
- Safety Eyes (optional) – Add these for a whimsical touch to your bear ears, enhancing the charm of the bear baby sleeper.
Why is the Bear Baby Sleeper Special?
Charming Design: The cute bear ears make this sleeper not just functional, but a playful delight for babies and parents alike.
Cozy Fabric: Made with medium weight yarn, it envelops your little one in soft, breathable comfort.
Engaging Project: Perfect for intermediate crocheters, it offers a fun challenge while enhancing your skills.
Practical Use: Designed for everyday wear, this sleeper ensures your baby stays cozy during naps and playtime.
Customizable Touch: The ability to personalize colors and styles lets you create a unique piece that fits your nursery theme perfectly.
Stash-Friendly: Use up your favorite leftover yarns to craft this delightful piece, making it both economical and satisfying!
Gauge & Sizing Notes
Don't skip the gauge swatch! Getting the right tension is essential for your bear baby sleeper to ensure it drapes comfortably around your little one. A general guideline for the gauge is to aim for a tension swatch of approximately 4×4 inches (10×10 cm), which typically might yield around 14 double crochets by 8 rows; however, it's best to check your own work as variations may occur. If you wish to make this cozy piece larger or smaller, adjust your starting chain in multiples of 6 + 2 for the hood width. Should you find your swatch too small, simply go up a hook size, and if it’s too large, try a smaller size to achieve the perfect fit for your bear baby sleeper. Happy crocheting!
Step-by-Step Pattern for Bear Baby Sleeper
Row 1: Create the Hood Foundation
Start by chaining 70 (or adjust for desired width). In the second chain from the hook, work a single crochet (sc). Continue with sc across the row until you have 69 sc. Turn your work, and your foundation should have a neat and tidy appearance for the bear baby sleeper.
Row 2: Build the Ribbed Edge
For the second row, chain 1 and work in the back loops only, placing a single crochet (sc) in each stitch across (69 sts). This creates a ribbed effect. You should begin to see the texture forming, which will help keep the hood snug and cozy around your baby’s head.
Row 3: Transition to the Body
Change the stitch pattern for the next row by chain 3 to start forming the body. Work a double crochet (dc) in each stitch across (69 sts), providing a soft and stretchy feel. Your work should start to widen, forming a lovely base for the bear baby sleeper.
Row 4: Establish the Hood Shape
Continue creating the hood by alternating between double crochet (dc) and single crochet (sc) stitches for this row. Work 1 dc, followed by 1 sc into the next stitch, repeating across the row (69 sts). The change in stitches adds dimension while enhancing the structural design.
Row 5: Complete the Hood
To finish shaping the hood, work 3 rows of double crochet (dc) only (69 sts each) to give it depth and comfort. After these rows, your hood should have a pronounced form, ready for cozy bear ears as you progress through the bear baby sleeper.
Step 6: Create the Bear Ears
To start the ears, make a magic ring and chain 2, then work 6 double crochets (dc) into the ring (6 sts). Pull tight to close the ring. In the next round, work 2 dc in each stitch around (12 sts). Your ears will look plump and cute, ready to be attached to the hood.
Step 7: Attach Ears to the Hood
Position the ears about 3 rows down from the top of the hood and attach using a slip stitch (sl st) to secure them in place. Make sure they are even on both sides so that your bear baby sleeper has that charming whimsical look.
Step 8: Begin the Sleeves
For the sleeves, chain 30 and in the second chain from the hook, work 1 sc. Continue with a combination of sc and double crochet (dc) until you reach the desired sleeve length (approx. 12 inches). Each row should alternate to achieve a textured look that complements the main body.
Step 9: Work the Body Downward
Join the sleeves to the body by continuing down with the main color. Chain 1, then work 2 double crochets (dc) in each sleeve and continue down the body (approximately 90 sts). Your work should now begin to flare out, forming the cozy design of the bear baby sleeper.
Step 10: Finish the Body
Carry on with double crochet (dc) until the body measures approximately 24 inches in length. The overall drape should be soft yet substantial, making it ideal for wrapping your little one in warmth during sleep.
Step 11: Add the Edging
For the edging, single crochet (sc) all around the hem and sleeves. This not only finishes the look but also provides a clean, polished finish. Your bear baby sleeper should now feel snug, with a nice finish that frames all the love you’ve crocheted into this project.
What to Pair with the Navy Bear Baby Sleeper?
Create a cozy ensemble that delights with these charming additions to your sweet bear baby sleeper.
-
Bear Eared Hat: A snug hat to match, perfect for keeping little heads warm and adding that whimsical touch.
-
Cuddly Blanket: Craft a matching blanket to wrap your baby in comfort, using the same yarn for that unified look.
-
Mini Bear Booties: Adorable booties that will keep tiny toes toasty, ensuring every part of your baby’s outfit is cohesive.
-
Plush Toy: Crochet a small bear companion using leftover yarn, providing the perfect cuddle buddy for your little one.
-
Cozy Mittens: Delicate mittens to complete the look, keeping baby’s hands warm during chilly outings or lounging at home.
How to Wash and Care for Your Bear Baby Sleeper
-
Machine Washing: Use cold water on a gentle cycle to maintain the softness of your bear baby sleeper, avoiding agitation to prevent any pulling or felting.
-
Hand Washing: If you prefer, hand wash with mild detergent in cold water, gently pressing the fabric to remove dirt without wringing, ensuring its cozy texture remains intact.
-
Drying/Blocking: Lay the sleeper flat to dry, reshaping as needed to maintain its form. Avoid hanging, as this can stretch the fabric and change the cozy drape.
-
Storage: Store in a cool, dry place when not in use. Folding rather than hanging will help retain the lovely shape of your bear baby sleeper, keeping it ready for snuggles!
Bear Baby Sleeper Variations
Embrace your creativity by customizing the bear baby sleeper with these delightful ideas.
-
Yarn Weight Change: Swap the medium weight yarn for a lighter DK to create a breezier option for warmer weather.
A lighter yarn allows for playful experimentation with colors and patterns, making it perfect for summer snuggles. -
Fiber Alternative: Try using 100% cotton yarn instead of acrylic for a more breathable, natural feel.
This switch will give your baby sleeper a softer touch while ensuring it's easy to wash and maintain, perfect for baby's delicate skin. -
Color-Blocking Fun: Incorporate vibrant color blocks into the body design by alternating yarn colors every few rows.
This playful technique creates a bright, eye-catching aesthetic that can brighten any nursery, showcasing your creativity and flair. -
Size Adjustment: To extend the sleeper's usability, adjust the initial chain and row count to create a larger size.
This variation ensures that your little one can enjoy their cozy bear sleeper for longer, growing with them through their infancy. -
Textured Sleeves: Add a fun texture by working the sleeves in a puff stitch instead of the standard sc/dc mix.
The bulky texture will create a cozy feel, providing added warmth and character, making every cuddle extra special. -
Pom-Pom Embellishments: Attach playful pom-poms at the ends of the sleeves for an extra touch of whimsy.
This charming addition enhances the playful spirit of the bear baby sleeper, making it a delightful accessory for any little one. -
Fringed Edging: Replace the standard single crochet edging with fringed detailing for a more boho-chic look.
This variation brings a modern twist to a classic design, making it ideal for creating picture-perfect memories during playtime. -
Animal Ears Options: Swap the bear ears for bunny or kitty ears for a completely new character theme.
This customization lets you cater to different tastes and themes, making each sleeper uniquely special for your little bundle of joy.
Expert Tips for the Bear Baby Sleeper
-
Check Your Tension: Make sure to test your gauge before starting. Consistent tension ensures that the sleeper fits snugly and comfortably.
-
Count Stitches Carefully: Use a stitch marker at the beginning of each round to keep your place and avoid losing count, especially when working in the round.
-
Soften Your Stitches: Consider blocking the finished piece. Gently stretching and shaping the bear baby sleeper will help soften any tightly crocheted areas for a better drape.
-
Secure Those Ears: When attaching the bear ears, make sure they are evenly spaced and securely fastened to avoid wobbling as your little one moves.
-
Finish Neatly: When adding the edging, ensure all stitches are uniform to give your bear baby sleeper a polished, professional look.
Navy Bear Baby Sleeper FAQs
Can I substitute the yarn for the Bear Baby Sleeper with a different fiber?
Absolutely! You can use any medium weight yarn (category 4) such as a cotton blend or even a soft wool for added warmth. Just be sure to check the yarn label for gauge information and adjust your hook size if necessary for the best results.
How do I make the Bear Baby Sleeper larger or smaller?
To adjust the sizing, consider increasing or decreasing the number of chains in your initial hood foundation. For a larger size, add more chains in increments of 5, and for a smaller size, remove chains in the same increments. Keep in mind that changes in size may slightly affect the yarn used.
Why is my work curling while making the Bear Baby Sleeper?
Don't panic! Curling often happens when the tension is too tight. Check your stitches and make sure you're not pulling too hard while crocheting. If it persists, try relaxing your grip and possibly using a larger hook to allow for better drape.
What size hook should I use for the Bear Baby Sleeper?
For this pattern, a 5.0 mm (H-8) hook is recommended. This size is ideal for achieving the cozy texture that's perfect for baby wear. If you find your stitches are too tight or too loose, don't hesitate to switch to a hook size that gives you the desired tension!
How can I fix a dropped stitch in my Bear Baby Sleeper?
It’s an easy fix! Simply find the dropped stitch, and pull it back up to the level of the stitches around it. Use your hook to crochet it back into the row. If you're uncertain, you can always frog back a few rows to ensure stitches line up nicely.
Leave a Reply