
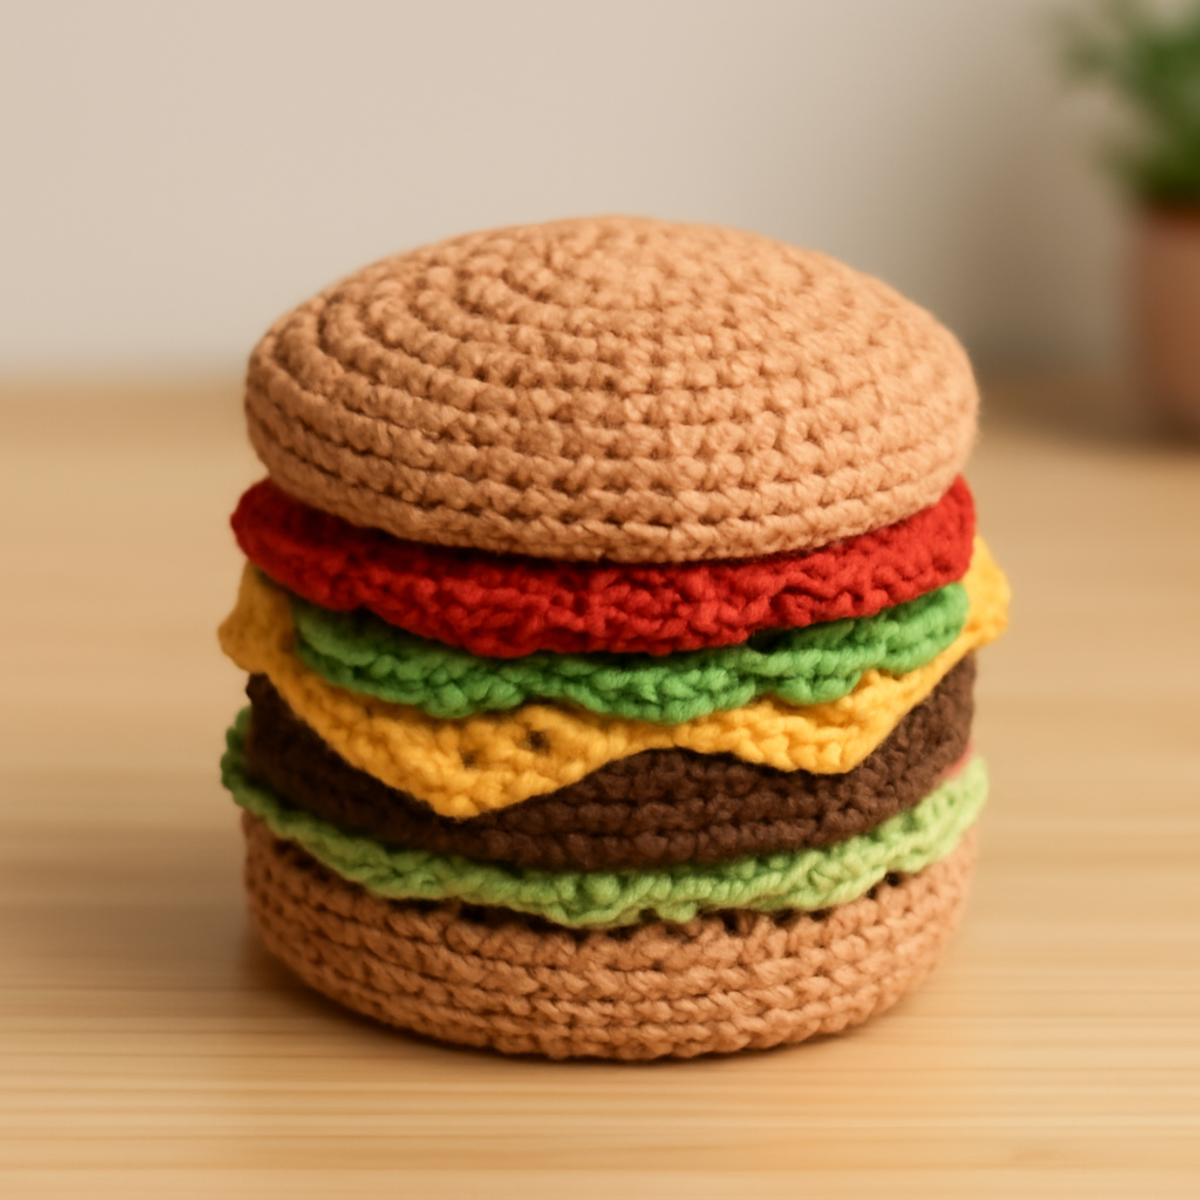
As I sat in my cozy corner with yarn spilling out of the basket, I found myself enchanted by the thought of crafting a playful crochet burger. This whimsical mini burger stack project isn’t just a feast for the eyes; it’s perfect for crafters of all levels and brings a splash of joy to any space. Not only is it simple to make, making it a fantastic choice for beginners, but it also serves as a versatile décor piece or a delightful toy to spark imaginations in the little ones. With straightforward stitches and an assembly method that feels like putting together a fun puzzle, this crochet burger is sure to become a cherished creation. Are you ready to stack those delicious layers and bring a smile to your day? Let's dive in!
Crochet Burger Materials & Tools
Yarn
- Worsted Weight Yarn – Choose a range of colors: tan for the buns, red for ketchup, green for lettuce, yellow for cheese, and brown for the patty, with a total of approximately 100-150 yards.
Tools & Notions
- 5.0mm (H) Hook – This size is ideal for worsted weight yarn, ensuring a nice stitch definition.
- Stitch Markers – Great for keeping track of rows, especially as you build those fun layers.
Why Create a Crochet Burger?
Whimsical and full of charm, this crochet burger is a delightful project that brightens any space. Simplicity reigns here, as the easy stitches make it approachable for beginners. Soft texture adds a cuddly feel, perfect for imaginative play. Versatility lets you use different colors and customize toppings, making each burger uniquely yours. Display it proudly or gift it to someone special—this project is sure to inspire smiles!
Gauge & Sizing Notes
Don't skip the gauge swatch! Ensuring your tension is correct is essential for a successful crochet burger that looks just right. A standard guideline for this project is about 4×4 inches (10×10 cm) square with approximately 16 double crochets by 8 rows—though your numbers may vary based on your specific hook size and yarn choice. To make your crochet burger larger or smaller, simply adjust your starting chain in multiples of 4 for the layers to maintain proportionality. If your tension doesn't match, don't worry! If your swatch is too small, try going up a hook size; if it's too large, go down a size. Happy crafting!
Step-by-Step Pattern for Crochet Burger
Row 1: Starting the Top Bun
Begin by creating a magic circle. Work 8 single crochets (sc) into the circle, then pull to tighten. Join with a slip stitch (sl st) to the first sc to form a round. Your work should appear circular and tight, setting the stage for the adorable bun. (8 sts)
Row 2: Expanding the Top Bun
Ch 1 and work 2 sc in each stitch around for this row, increasing to make the bun wider. This will create a lovely, rounded shape. Remember to join the round with a sl st in the first sc. (16 sts)
Row 3: Continue to Increase for the Bun
Ch 1, then work 1 sc in the first stitch, followed by 2 sc in the next stitch. Repeat around to create a bell shape, maintaining the bun's fullness. Sl st to close your round. (24 sts)
Row 4: Finalize the Top Bun Shape
For this row, ch 1 and work 1 sc in each of the next 2 stitches, followed by an increase (2 sc) in the next stitch. Continue around, ensuring a snug shape for your burger bun. Sl st at the end to finish. (32 sts)
Row 5: Start the Patty
Change to your brown yarn for the burger patty. Ch 1, work 2 dc in the same stitch, and then 1 dc in the next three stitches. This will create a thick, delicious-looking patty that sits nicely between the buns. Sl st to join. (40 sts)
Row 6: Build the Patty Thickness
Ch 1 and work in this row: 1 dc in the first 4 stitches, then 2 dc in the next stitch. This creates a more substantial depth for the patty. Sl st to close your round and check that your work has a rounded appearance. (50 sts)
Row 7: Form the Cheese Layer
Switch to yellow yarn for your cheese. Ch 1, and work 1 sc in each stitch around to create a flat layer for your cheese. This layer should sit gently atop the patty, blending well with the previous sections. Sl st to finish. (50 sts)
Row 8: Create the Ketchup Layer
Now, change to red yarn for the ketchup layer. Ch 1, and work 8 sc to form a wavy edge around the layer, giving the ketchup a drippy effect. Your work should look like a flavorful topping on your soft burger. Sl st to close. (50 sts)
Row 9: Make the Lettuce Layer
For the lettuce, use green yarn. Ch 1 and work (sc, ch 1, sc) in each stitch around for a fun, wavy leaf effect. This layer should have a whimsical, ruffled look, adding charm to your crochet burger. Sl st to finish your last round. (50 sts)
Step 10: Assemble the Burger
Carefully stack each layer: start with the bottom bun, followed by the patty, cheese, ketchup, lettuce, and finally, the top bun. Use sl st to attach each layer together securely, ensuring a neat finish as you create your delightful crochet burger.
Crochet Burger Variations
Embrace your creativity and let your crochet burger shine with delightful customizations that reflect your unique style!
-
Yarn Color Swaps: Change the tan yarn to a lighter or darker shade for a fun twist on the burger bun's look. This simple swap can dramatically alter its vibe!
-
Layer Flavor Variety: Use a rainbow of colors for each layer to represent different toppings. Imagine a bright blue cheese or a playful pink burger patty!
-
Yarn Weight Adjustments: Experiment with thicker yarn for a jumbo burger or finer yarn for a mini version. Size options add excitement and personalization to your creations.
-
Texture Enhancements: Incorporate fun textures by adding embroidery or embellishments—like tiny sesame seeds on the bun—bringing an extra layer of whimsy to your burger stack.
-
Layering Techniques: Explore various stitch patterns for each layer. For instance, use bobble stitches for cheese to give it a bumpy, realistic appearance.
-
Size Variations: Adjust the number of rows or stitches to create a taller or shorter burger stack. This allows for endless possibilities in height and proportion.
-
Charming Borders: Add a quirky border around the burgers for an eye-catching finish. A simple picot edge can enhance the playful nature of your design.
-
Accessories Addition: Try crocheting a cute side of fries or a tiny drink to complete your meal theme. This can elevate your crochet burger into a delightful tabletop display!
Expert Tips for Crafting a Crochet Burger
-
Maintain Tension: Consistent tension is crucial for a uniform burger appearance; consider blocking your pieces after finishing for a polished look.
-
Use Stitch Markers: Mark each new layer with a stitch marker to avoid losing count or mistakenly skipping stitches—this is especially helpful for beginners!
-
Secure Assembly: When stacking your crochet burger layers, gently pull on each layer to ensure they fit snugly together, avoiding gaps that detract from its cuteness.
-
Check Your Ends: Pay attention when finishing off; ensure all yarn ends are securely woven in to prevent unraveling—this keeps your crochet burger looking fabulous for friends!
-
Experiment with Materials: Try different yarn types that have a slight stretch. This promotes a wonderful shape that maintains both form and cuteness in your crochet burger.
What to Pair with Crochet Miniature Burger?
As you embark on your delightful crochet journey, consider crafting playful companions that enhance the whimsical charm of your burger creation.
-
Fries Amigurumi: These adorable little fries can be crafted in a jiffy, adding a delicious sidekick to your burger. Imagine the joy on a child's face as they play!
-
Cozy Picnic Blanket: A vibrant throw made from the same yarn can elevate your burger's display. It creates a delightful picnic scene wherever you showcase your crocheted wonders.
-
Burger-themed Coasters: Simple yet effective, these coasters can mimic the look of real burger ingredients, adding a playful touch to your home decor.
-
Kooky Plush Vegetables: Carrots and tomatoes give life to your crochet burger, enhancing imaginative play. Plus, they make a great learning tool for healthy eating!
-
Mini Placemats: Craft these fun, colorful mats as a fun setting for your burger. They can bring an aesthetic unity to your crochet collection, while also being functional.
Care Instructions for Crochet Burger
Machine Washing: Use cold water on a gentle cycle to clean your crochet burger. Avoid agitation to prevent felting or pilling, ensuring it stays soft and squishy.
Hand Washing: If you prefer, gently hand wash with mild soap in cool water. Swirl lightly without scrubbing to maintain the burger's charming form.
Drying/Blocking: Lay your crochet burger flat to dry on a clean towel. This method preserves its lovely shape and texture while drying without distortion.
Storage: Keep your crochet burger in a cool, dry place, away from direct sunlight to maintain its vibrant colors and cuddly appearance. Enjoy displaying this delightful piece!
Crochet Miniature Burger FAQs
Can I use different yarn types for my crochet burger?
Absolutely! While worsted weight yarn is recommended for the best results, you can experiment with cotton or acrylic yarn for different textures. Just keep an eye on your gauge—testing a small swatch can help ensure your burger maintains its adorable shape!
How can I make my crochet burger bigger or smaller?
To adjust the size of your crochet burger, simply change the yarn weight. If you opt for a heavier yarn, it will create a larger burger, while using a lighter yarn will yield a smaller one. You can also modify the number of rows in each section to balance proportions!
Why is my crochet work curling at the edges?
Don't panic! Curling can happen, especially with single crochet stitches. It might be due to tight tension or not enough increases. To fix this, try using a larger hook size or giving your finished burger a gentle block to help it lay flat.
What hook size should I use for my crochet burger?
I recommend using a 5.0 mm (US H-8) hook for the best results with worsted weight yarn. This size creates a nice stitch definition, allowing your burger layers to hold their shape beautifully. If you select a different yarn weight, you may need to adjust your hook size accordingly!
How do I fix dropped stitches in my crochet burger?
It's an easy fix! Simply locate the dropped stitch, gently pull the working yarn back up through the row below with your hook, and resume crocheting. For tighter stitches or complex stacked sections, consider using a stitch marker to keep track as you progress!
Can I add embellishments to my crochet burger?
Absolutely! Feel free to personalize your crochet burger by adding embroidery to replicate toppings or even sew on decorative elements like sesame seeds. This makes your project uniquely yours while adding an extra dose of whimsy to your creation.
Leave a Reply