
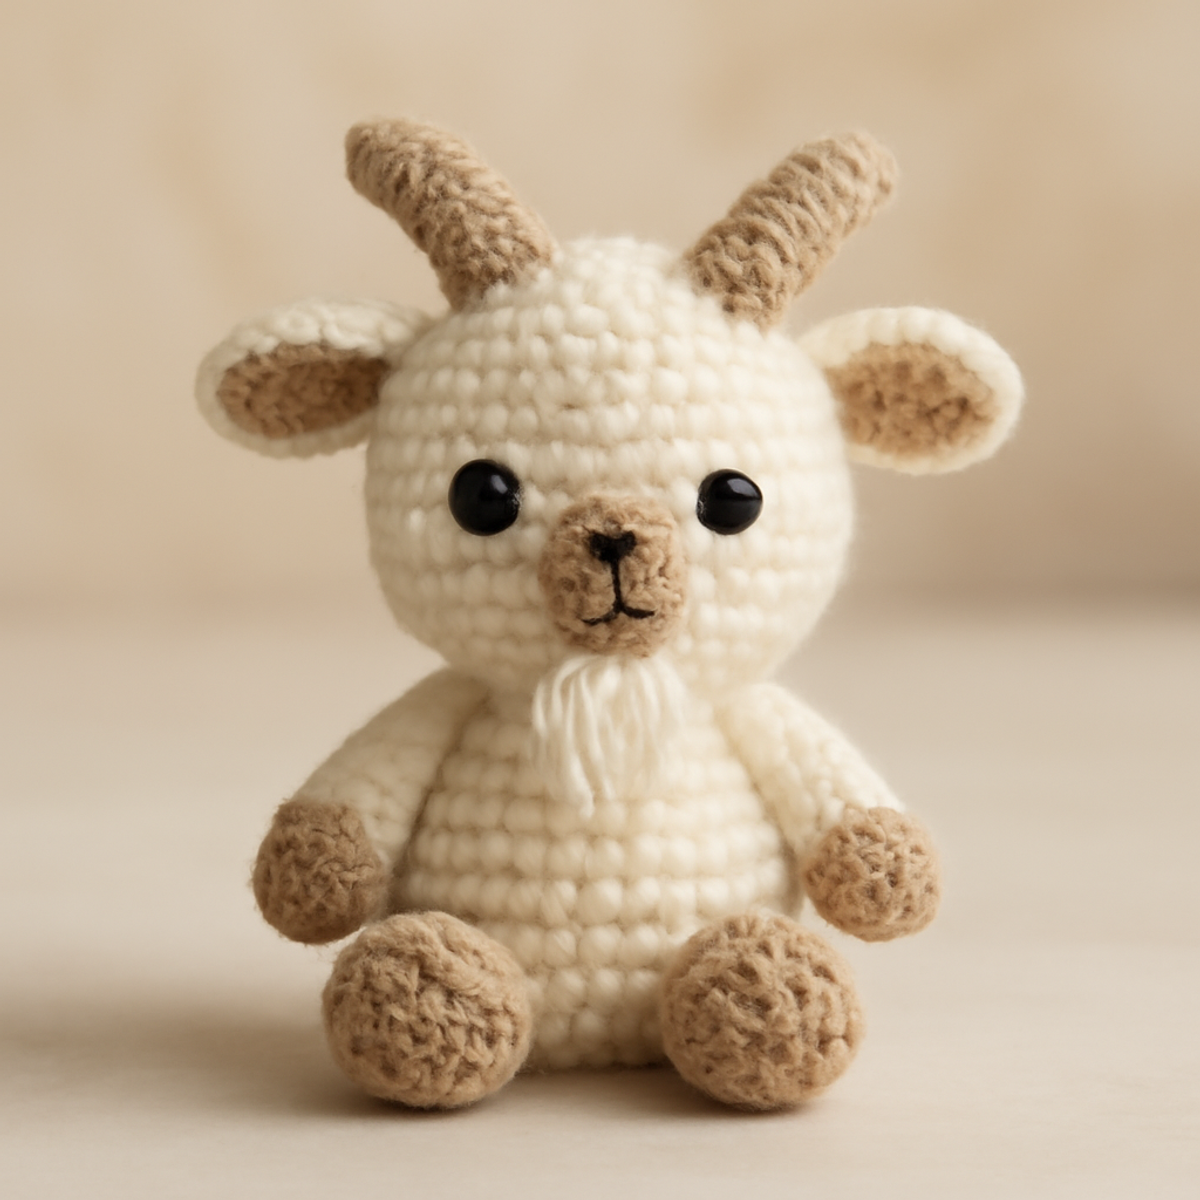
As I sat on my cozy couch, the soft yarn slipping through my fingers, I felt a rush of joy at the thought of crafting a fluffy mountain goat crochet companion. This charming pattern combines whimsical design with cuddly comfort, making it a delightful project for crafters at all skill levels, especially beginners. The Fluffy Mountain Goat is not just a stuffed plush toy; it serves as a heartwarming gift or playful decor that brings smiles to both kids and collectors alike. With simple stitches and an easy assembly process, you’ll find that creating this adorable amigurumi is not only fun but also incredibly rewarding. Plus, its plush texture is perfect for squeezing tight, offering comfort to little ones and adding cheer to any room. Are you ready to embrace your inner crochet artist and dive into this delightful adventure? Let's get started!
Fluffy Mountain Goat Crochet Materials & Tools
-
Yarn
- Plush or Chenille Yarn – Choose a soft yarn for a cuddly feel; approximately 200 yards in total are needed for the whole project.
- Worsted Weight (4) – This yarn weight ensures the goat is substantial yet huggable; consider using varying colors like cream, warm beige, or sage green.
-
Tools & Notions
- 5.0mm (H-8) Hook – Perfect for maintaining the right tension with plush yarn to create your fluffy mountain goat crochet.
- Safety Eyes (10 mm) – These add delightful character and detail to your goat's face.
- Stitch Marker – Helps keep track of your rows and stitch counts throughout the project.
- Scissors – Essential for cutting yarn ends and any other trimming needed.
- Polyester Stuffing – Fill your goat to keep it soft and cuddly; ensure to distribute evenly for the best shape.
Happy crafting! Your fluffy mountain goat will soon be a charming companion.
Why Make a Fluffy Mountain Goat Crochet?
Whimsical Design: The Fluffy Mountain Goat offers a playful aesthetic that instantly brightens any space, making it an eye-catching addition to your decor.
Easy Stitches: This pattern is designed with simple crochet stitches, perfect for beginners, ensuring a satisfying crafting experience without overwhelming complexity.
Cuddly Comfort: Its plush texture invites hugs and snuggles, making it an irresistible companion for children and a charming gift for any occasion.
Customizable Colors: You can experiment with vibrant or pastel shades, tailoring your goat to fit personal styles or seasonal themes.
Quick Project: The straightforward assembly means you'll have a lovable creation ready in no time, fulfilling your crafting cravings efficiently!
Dive into this whimsical crochet adventure, and let your creativity soar!
Gauge & Sizing Notes
Don't skip the gauge swatch! Checking your tension is essential for ensuring that your fluffy mountain goat crochet project turns out as adorable as you envision. As a general guideline, a tension swatch of 4 inches (10 cm) square should ideally measure around 14 single crochets by 8 rows. If you'd like to make your goat slightly larger, simply increase your starting chain in multiples of 6, or adjust your stitch count for the body accordingly. If your swatch turns out too small, consider going up a hook size to achieve the perfect plushness. Happy crafting, and enjoy creating your charming fluffy mountain goat!
Step-by-Step Pattern for fluffy mountain goat crochet
Row 1: Start the Head
Begin with a magic ring and chain 2. Work 12 dc into the ring, then pull it tight to close (12 sts). Your work should form a small circle, setting the foundation for the goat's head.
Row 2: Increase the Head
In this round, (inc) each stitch around by placing 2 dc in each stitch from the previous row (24 sts). The circle will expand, creating a nice round shape for the head.
Row 3: Shape the Head
Next, work 1 dc in the first stitch, then (inc) in the next stitch. Repeat this pattern around (36 sts). Your head should start to cup slightly, giving it a nice depth.
Row 4: Continue Shaping
For this row, work 2 dc in the first stitch, then 1 dc in the next 2 stitches. Repeat this for the entire round (48 sts). The shape should become more defined, continuing to round out.
Row 5: Begin the Body
Switch to the body by working in continuous rounds. Start with 1 sc in each of the next 48 sts (48 sts). The work will start to drop down and create the body of your fluffy mountain goat.
Row 6: Increase the Body
To create a plump body, (inc) in the first stitch and then 1 sc in the next stitch, repeating around (72 sts). You’ll notice that the body expands beautifully.
Row 7-11: Form the Body
For the next five rounds, simply work 1 sc in each of the 72 stitches. Your work should showcase a lovely continuation of the body shape, remaining consistent and firm.
Row 12: Shape the Bottom
To create a rounded finish at the bottom, work 1 sc in the first 12 sts, (dec) 1 stitch, and repeat around (60 sts). Your work should start to taper slightly as you form the body.
Row 13: Begin the Legs
It's time for the legs! Attach the yarn for the front legs in the desired position and work 8 sc (8 sts). Your work will start to take shape as you prepare the adorable legs.
Row 14: Legs Details
For each leg, continue working 8 sc for the next 5 rounds, keeping the tension firm yet soft (8 sts each). Your legs should appear rounded and plump, ready for assembly.
Step 1: Create Ears
To form the ears, start with a magic ring, chain 2, and work 6 sc into the ring (6 sts). Your work should take on a tiny round shape resembling the ear base.
Step 2: Shape Ears
In the next round, (inc) in each stitch to double the count (12 sts). The ears will grow larger, showing a lovely dimension that will later enhance the goat's character.
Step 3: Add Detail to Ears
Continue with 1 sc in the first stitch, (inc) in the next stitch all the way around (18 sts). The ears should be soft and inviting, perfect for adding personality to your fluffy mountain goat.
Step 4: Finish Assembly
Carefully sew the ears, legs, and safety eyes onto the head and body. Begin with positioning the arms and ensuring they’re secure and well-attached for uniformity.
Step 5: Final Touches
Complete your fluffy mountain goat crochet by embroidering the mouth and adding a yarn beard. You will notice your delightful plush companion coming to life!
Expert Tips for Fluffy Mountain Goat Crochet
-
Consistent Tension: Keeping an even tension is crucial with plush yarn. Loose stitches can stretch the goat’s shape, while tight stitches may cause difficulty in assembling and stuffing.
-
Track Your Stitches: Use a stitch marker to note the beginning of each round. Losing count can lead to uneven proportions, so it's handy to have this visual guide as you work.
-
Check for Stretch: Keep an eye on how your plush yarn stretches. If it begins to sag or feel loose after a few rounds, adjust your grip to maintain the goat's rounded form.
-
Secure Assembly: When attaching pieces like the legs or ears, make sure to sew them securely. This not only adds to the aesthetic but also ensures your fluffy mountain goat crochet withstands cuddles and play!
-
Final Blocking: Consider light blocking after assembly to maintain the goat's shape, especially the ears and horns. A gentle steam can help them stand tall and proud!
What to Pair with Fluffy Mountain Goat Amigurumi
As you venture beyond your fluffy mountain goat crochet, crafting a charming companion ensemble will elevate your project even more.
- Cuddly Goat Blanket: Create a matching blanket in soft tones to wrap around your plush, offering cozy comfort for playtime snuggles.
- Whimsical Forest Friends: Make a collection of other animal amigurumi, such as a plush deer or bunny, to complete your woodland theme.
- Miniature Goat Keychain: Craft a tiny version of your mountain goat that can be used as a keychain, making a delightful gift for friends.
- Nature-Inspired Wall Hanging: Design a crochet wall hanging adorned with little trees and flowers, adding a whimsical touch to your child’s room alongside the goat.
- Playful Goat Hat: Knit or crochet a playful hat with goat ears to match your plush toy—a fun wearable piece for your little one.
Fluffy Mountain Goat Crochet Variations
You can easily add your own flair to this crochet pattern, exploring endless possibilities that spark joy and creativity.
-
Yarn Substitutions: Use cotton yarn for a firmer finish; it offers a nice contrast to the plush texture while still maintaining cuteness.
Consider transitioning between fibers for added interest, like combining different yarn types for unique effects. -
Color-Blocking: Experiment with vibrant colors like teal or mustard for a whimsical twist that catches the eye.
This technique allows you to create sections, adding a playful element to your goat and making it truly one-of-a-kind. -
Miniature Version: Create a smaller version of the goat by using a lighter yarn weight, like DK, and adjusting your hook size.
Perfect for keychains or adorning a bag, this tiny companion is just as charming as its larger counterpart! -
Thicker Weight Yarn: Choose bulky yarn for a supersized goat that becomes a statement piece in any room.
This plush giant invites cuddles and serves as a lovely decorative centerpiece, captivating hearts everywhere. -
Textured Ears and Horns: Add surface crochet techniques or mix in some bobbles to enhance the dimensionality of ears and horns.
These small details create delightful features, encouraging playful touches and exploration of texture. -
Custom Facial Features: Alter the mouth or add unique embroidery elements for personalized expressions.
Customizing facial details can give your goat a special character, making it truly yours. -
Fringe or Pompoms: Attach cute yarn pom-poms or fringe to the goat's body for a fun, tactile addition.
This playful detail not only grabs attention but makes your creation inviting to touch, adding to the cuddly vibe. -
Seasonal Themes: Crochet your goat in holiday colors or patterns to celebrate different occasions throughout the year.
This keeps your crafting fresh and fun, allowing you to showcase creativity in a seasonal context.
Care Instructions for Fluffy Mountain Goat Crochet
-
Machine Washing: If washing is necessary, place your fluffy mountain goat crochet in a mesh laundry bag and use cold water on a gentle cycle to prevent damage to the plush fibers.
-
Hand Washing: For a more delicate clean, hand wash in cold water with a mild detergent. Gently squeeze the toy without wringing to maintain its shape and avoid felting.
-
Drying/Blocking: Lay your goat flat on a clean towel to dry, reshaping as needed. Avoid hanging, as this may stretch out the body or limbs.
-
Storage: Store your fluffy mountain goat crochet in a cool, dry place, away from direct sunlight to maintain its colors and fluffy texture for years to come.
Fluffy Mountain Goat Crochet FAQs
Can I use a different yarn type for the Fluffy Mountain Goat crochet?
Absolutely! You can swap out plush or chenille yarn for cotton or acrylic yarn. Just keep in mind that a lighter yarn can yield a firmer texture, so your goat may appear slightly different. If you decide to use cotton, I suggest adjusting your hook size to match the yarn weight for the best results!
How do I adjust the size of my fluffy mountain goat crochet?
Don’t panic! If you want to customize your goat's size, you can either use a thicker yarn with a larger hook for a supersized version or switch to a lighter weight yarn for a mini goat. Just remember to maintain a consistent stitch count based on your yarn choice to keep an even shape.
Why is my work curling while crocheting the goat?
This is a common issue, especially with plush yarns! A couple of things could be happening: your stitches might be too tight, or you might be missing some increases. Try relaxing your tension and focus on making sure you’re hitting all the increases specified in the pattern. If it keeps curling, blocking the finished piece can also help!
What size crochet hook should I use for this pattern?
For the Fluffy Mountain Goat crochet, a 5 mm (H-8) hook is recommended. This size is perfect for creating a plush and cuddly finish. If you’re experimenting with different yarn types, remember to adjust your hook size accordingly to maintain the desired texture!
How can I fix my dropped stitches in this crochet project?
It’s an easy fix! Simply locate where the stitch was dropped and carefully pull the working yarn through the loop that was missed. Then, continue crocheting as normal. If you’re not sure, you can always unravel back to the last complete round and re-crochet. Don't hesitate to reach out for support if you need more help!
Leave a Reply